An ongoing journal of the history of the Bolles Family. From the first settler, Joseph Bolles of Wells, Maine in 1640, all past and present facts, thoughts, events, research and items of interest on this and allied families.
Does your family archive hold yellowed and crumbling news clippings
from years gone by? If so, you have a lot more than an old newspaper in
your hands. You own a piece of history that’s becoming more rare each
day. But unfortunately, that same clipping is a toxic time bomb that can
damage anything it touches, turning artifacts into archival junk in
just a few short years.
It’s the very nature of newspapers to be short-lived: Yesterday’s
headlines are constantly being replaced by today’s breaking news.
Newsprint is so acidic that some museums routinely copy news clippings
and destroy the originals. Early broadsheets and newspapers were printed
on paper made from the cotton rag pulp, but by the 1880s most
newspapers were printed on cheap paper made from untreated wood pulp.
The high concentration of acid and lignin in this type of newsprint
causes the paper fibers to break down when exposed to heat, light, air,
and pollutants.
Describe the origins of your heirlooms for better integration with your family history using this free form.
What’s the family historian to do? Save every newspaper clipping for
posterity? Or duplicate, and then destroy? Not to mention preserving
your own family’s news stories that you continue to clip and save for
your children or grandchildren. Is today’s news truly trash?
Don’t despair. Before you add your old newspapers to the recycling
bin, get to the bottom of the story about how to create a properly
preserved family news archive.
1. Digitize your clippings
Museums, archives and public libraries have adopted different tactics
when it comes to preserving newspapers. While museums and archives aim
to preserve original materials, libraries want to make the information
in that material easily available. Some organizations might print copies
of newspapers and clippings on archival paper and discard the original
due to lack of space and funds for archival supplies.
Your own family history news archive may hold original full-size
newspapers, loose clippings, photocopied articles (some pasted into
scrapbooks), as well as a variety of scanned news clippings and
photocopies, and typed transcriptions.
Your first preservation step is to digitize paper copies (whether
original newsprint or photocopies on regular office paper) by taking a
photo with your digital camera or scanning the paper. With a desktop
scanner, check the option for de-screening to eliminate those tiny dots
from the original printing process. If the publication information isn’t
printed with the clipping, write or type it (newspaper title, date,
volume and issue, page number, and the repository or website holding the
paper) and include it with your scan. Add your own identifying index
words, such as the surname the item is associated with, plus the place
or the event depicted.
Got a full-size paper to digitize? I’ve found the simplest way is to
take a digital photo of the entire page. My camera takes an 8.1
megapixel image that allows sufficient enlargement on the computer to
easily read the articles. Covering the page with a piece of nonglare
glass will help flatten creases, but can make the final scan harder to
read, so try it both ways. Use a tripod or flexible mount to hold your
camera steady.
You also could use a portable flatbed scanner to make multiple images
you can “stitch” together with included software. A typical newspaper
page might require several scans to capture the entire page. With the
Flip-Pal, you can position the scanner to overlap the images, then use
the stitching software to create a full-page image. The scanning and
stitching process can be time-consuming if you have many full
newspapers.
I don’t recommend using your desktop scanner for anything larger than
the scanning glass because it’s difficult to maneuver a full newspaper
page without damaging the paper.
2. Protect against acids
Museums sometimes preserve aging newsprint by deacidification, a process that neutralizes the acids in the paper, and alkinization, which adds buffering ingredients to the paper.
You can do this at home by treating small clippings with a
deacidification spray such as Archival Mist (from EK Success),
Make-It-Acid-Free (Krylon), Wei T’o (Wei T’o Associates) or Bookkeeper
(Lineco), available where scrapbooking supplies are sold. Follow the
instructions on the packaging. But note that these sprays are effective
for only seven to 10 years before they need to be reapplied. To maximize
longevity, place the treated clipping on a sheet of buffered paper and
then tuck it inside a polyester sleeve (see step 4 for more on storing
your clippings).
The cost of deacidification sprays—about $14 to $50 for a 6-ounce
bottle—and the amount needed for an entire newspaper or collection of
clippings makes it impractical for many family archivists. If you do use
a spray, test it first on a small area to make sure the ink won’t run.
You can find internet recipes for homemade deacidification solutions,
though reliability varies. The Northeast Document Conservation Center
(NEDCC) recommends against these. For home archives, the NEDCC says
it’s more practical to digitize clippings and print copies on archival
paper, then properly store the originals (see step 4).
3. Organize and file
Many family historians file obituaries, marriage notices and other
clippings in their primary filing system, under an individual or family.
This is a great way to keep research materials together about a family,
but it isn’t the best way to store newsprint items. The acid in
newsprint can easily migrate to adjacent documents and photos and damage
them.
Your goal should be to make all your clippings a uniform size: on
8.5×11-inch archival paper filed alphabetically by surname, event or
location so that you have only one place to look for an item. Decide if
you’ll preserve original clippings or just copies. The easiest file to
care for includes copies made only on bond paper. But I love the look
and feel of old newspapers, so I tend to keep original clippings in my
file. To reduce the risk of damage to other documents, I place each
clipping on a sheet of buffered paper—no glue, tape or adhesive. The
buffering agent in the paper helps neutralize acid in the newspaper and
prolong the life of the paper. Slide the paper and clipping inside an
archival page protector, leaving the top open. This allows the paper to
“breathe” and acids to escape.
I also keep printed transcriptions, abstracts and extracts of
newspaper articles in my file. Print copies of your digitized clippings
on acid-free, buffered archival paper. Consider making duplicates for
your genealogy files.
4. Store safely
Evaluate the size of your collection and purchase suitable-sized
archival boxes, folders and buffered acid-free tissue (see the box for
suppliers). You’ll need newspaper-size boxes for full-size sheets and
folder-size boxes for clippings.Open full newspapers flat and store them
separated by buffered tissue and folders. I find it easier to keep
track of clippings by storing the sleeves in three-ring binders.
Archival suppliers offer acid-free, lignin-free notebooks with slipcases
and tab dividers you can use. You might need to keep large clipping
files in a filing cabinet.
Store your boxes and binders away from light, dust, pests, and
extreme temperatures and humidity. If you keep your file in a cabinet,
open it occasionally to air out any acids that have been “off-gassed.”
Your newspaper archive should be stored separately from other material
in your archive—don’t put photographs and documents in the same folders
or boxes. Periodically review the file and remove any damaged items.
Reprint them on new archival paper if necessary.
5. Create an index
Your clipping file will be more useful if you create a searchable
index using keywords and other pertinent information associated with
each article. Set up a spreadsheet with columns for Surname, Locality,
Event, Date, Publication, Page/Column, Digital File Name and Clip File
Reference Number (if you’re using a numerical filing system). Enter each
clipping into the database and keep an updated copy of your index at
the front of your clip file. If you also save the index to the “cloud”
using Evernote or Google Drive, you’ll be able to access it from anywhere you’re researching.
By taking a few hours to create a family history clip file that
includes news clippings relevant to your ancestors’ lives as well as to
your own family, you’re preserving primary documents that your
descendants can see and touch. In a world that’s becoming more paperless
all the time, your very own family news archive will be a unique legacy
for the future.
A version of this article appeared in the January/February 2013 issue of Family Tree Magazine.
Most vintage Christmas ornaments don’t survive with their original
boxes intact. When you do have the ornaments along with the box they
came in, the set becomes more interesting to collectors and family
historians. The packaging can help to identify the ornament and add to
its value, but the flimsy cardboard box deserves a little extra care for
long-term survival. Most ornament boxes were made of inexpensive
cardboard, often with a lightweight cellophane window to display the
colorful contents.
Fortunately, Christmas decorations spend most of the year tucked out
of sight from heirlooms’ worst enemy: light. When holiday decorations
are stored in out-of-the-way places such as basements, attics and
garages, however, fluctuating temperatures, moisture and pests all can
cause damage, making Christmas not so merry after all.
If you own such holiday treasures, follow these guidelines to ensure they bring joy for many Christmases to come:
1. Display your ornaments safely
Place cotton batting or foam padding under your tree in case an
ornament falls (you can cover it with a tree skirt). Check ornaments’
caps and hooks before hanging to make sure they’re strong . Wrap thin
hooks around branches for support, or add new wire hooks. Keep them away
from direct sunlight. Another idea is to store and display them inside a
dust-free cabinet.
2. Clean carefully
After taking down the tree, gently dry-dust old glass
baubles—detergents and even plain water can remove paint. Wipe paper or
cardboard surfaces, with a slightly damp cloth, but to prevent warping,
clean a small area at a time and let dry.
Avoid washing antique fabric ornaments such as velvet and crochet.
Instead, take them to a professional conservator for treatment. It’s OK
to polish metal ornaments if they’re colorfast (test a tiny area first).
Clean wax ornaments with warm water and a soft cloth; if they’re bent
out of shape, use a hair dryer on low to soften the wax and reshape it.
3. Pack using the correct materials and store in a safe location
Start your storage solution by individually wrapping each ornament in
acid-free tissue paper, available from archival suppliers before
placing it in its original box. Then set that box inside another box to
prevent crushing and damage. If any ornaments lack their original boxes,
use sturdy, acid-free divided boxes to hold your collection. Opt for
heavy cardboard over plastic containers, which prevent moisture from
escaping. Be sure to store your keepsake ornaments in a location that
remains dry and cool year-round.
Acid-free tissue paper
Archival, acid-free tissue paper is one of the most useful supplies
in an archivist’s toolkit. Although it looks like regular tissue paper,
archival tissue is manufactured to remove damaging contaminants. Regular
tissue paper becomes acidic, discolored and brittle over time—damage
that extends to adjacent objects through acid migration.
Tissue paper is available in sheets or on rolls. Cut pieces to size
and crumple to cushion fragile items or stuff inside the sleeves of a
gown to prevent creases, or wrap gently around glass ornaments to shield
them from light and dust. Purchase acid-free, unbuffered tissue from a local art store or an archival supplier such as Hollinger Metal Edge, Brodart or Gaylord.
Fiberfill
For additional protection between ornaments and the bottom of a
storage box, use 100 percent polyester fiberfill (the same kind of
material used in quilts). You can remove any dividers and trim the
batting to cover the bottom and extend up the inside of the box, or cut
to fit the bottom of divided sections. Polyester batting is available
from fabric stores and archival suppliers; avoid batting made with
recycled or unknown materials.
What to Do With Broken Ornaments
Fragile glass ornaments can crack or break without notice. But don’t
throw out those chipped, nicked or damaged globes just yet: You can
breathe life back into them and show off their charm with a little
artful staging to hide the blemishes.
Put them on a pedestal: A broken or chipped neck can
make it difficult to attach a hanger when you’re decorating your tree.
But geometric patterns and all-over designs still look beautiful if you
turn the ornament upside down and display it on top of a candlestick
holder or in a glass vase or bowl. For a centerpiece or mantel
decoration, assemble three or more ornaments on a table with a candle.
Fix them: Missing metal caps, fasteners and hangers are replaceable. You’ll find a wide variety of styles and sizes from supplier D. Blümchen & Co.
Group them together: Holes and scratches are usually
the result of a fall off the tree or a bump into a hard surface. The
ornament might look fine on all sides but one. Collect similarly damaged
ornaments, along with any others you’d like to display differently, and
carefully arrange them in a large glass vase, bowl or hurricane candle
holder. Place the display where it’ll catch the room’s light and watch
the ornaments’ colors come to life.
Pick up the pieces: If an ornament that’s special to
you breaks beyond repair, you could carefully gather the salvageable
pieces into a decorative glass box to bring out at Christmas.
Identifying Shiny-Brite Ornaments
Count yourself lucky if your family managed to preserve a box or two
of classic glass Shiny-Brite ornaments. The history of these decorations
dates back to the hand-blown glass ornaments made in mid-19th-century
Germany. By the 1920s, glass ornaments also were produced in Japan,
Czechoslovakia and Poland. But when World War II closed the door to
European imports, German immigrant Max Eckardt seized the opportunity to
create an American version.
Eckardt worked with the Corning Glass Co. to manufacture clear glass
balls, which were then shipped to his four Shiny-Brite factories in New
Jersey to be hand-painted. The ornaments became a popular replacement
for German-made baubles, and after the war, Eckardt’s Shiny-Brite became
the world leader in production of glass Christmas ornaments.
You can use the caps and hangers on Shiny-Brite ornaments to help
date them. Early ornaments were made with metal caps, but wartime
shortages made it necessary to switch to a cardboard tab. Learn more
about midcentury glass ornaments by visiting the The Golden Glow of Christmas Past website.
A version of this article appeared in the December 2014 issue of Family Tree Magazine.
A free website from the Church of Jesus Christ of Latter-day Saints
(the Mormon Church), FamilySearch has a large, growing collection of
records, books, photos and family trees. Since going online in 1999, the
site has expanded to encompass more than 3,000 historical record
collections from around the world, more than 7 billion searchable names
in old records, and more than 450,000 digitized books.
You can search many of these records by name and other details,
thanks to FamilySearch’s volunteer indexing program. All the
genealogical bounty is accessible from tabs at the top of
FamilySearch.org.
Wait… Is FamilySearch really free?
When we say, “Everything on FamilySearch is free,” you’re probably waiting for caveats and limitations. Everything really is free! You will never be asked for credit card information or even to make a donation.
FamilySearch is funded by The Church of Jesus Christ of Latter-day
Saints, which has a strong religious commitment to families. But you
don’t have to be a Church member to use the site. And creating a free
user account will not prompt the Church to send you religious materials
(unless you create a Church member account.)
In fact, the only significant caveat is that you do need to create a free FamilySearch user account to maximize access.
You can search the Catalog without logging in. But you’ll need that
user account to search or browse actual records or contribute to the
Family Tree (which anyone can search or edit).
For a small minority of collections, you actually have to go to the Family History Library or one of its satellite libraries
near you to view records, like you would a reference copy of an
encyclopedia at your local public library. But that’s the end of the
fine print. The site really is free—and everyone should be using it.
Sunny Jane Morton
Use these tips and search strategies for success in finding your ancestors on FamilySearch.
1. Search for records.
At last count, FamilySearch is home to more than 4 billion historical
record images from around the world. Just take a second to let that
figure sink in: 4 BILLION IMAGES. Not just 4 billion estimated names in
images, but 4 billion actual images, many with lots of names on each.
These aren’t just a bunch of so-so records. They are high-quality
genealogical documents, painstakingly gathered over the course of
several decades from repositories around the world. That’s worth
breaking down into more detail:
Painstakingly gathered: FamilySearch’s predecessor organization began microfilming the world’s historical records in 1938.
That gave them a decades-long head start compared to other genealogy
websites. Now they’ve got a library of 2.4 million rolls of microfilmed
records, which they finished digitizing in 2021. And that doesn’t even
include the 300 camera crews currently capturing digital record images.
Repositories around the world:
As a nonprofit organization with truly global scope, FamilySearch has
imaged records from more than 200 countries. They don’t have “target
markets” that slant their priorities toward the needs of paying
customers because there are no paying customers. In fact, FamilySearch
actively seeks out records for locations that don’t already have good
online coverage on other websites. That’s why you’ll find so many
records uniquely on FamilySearch for places in Central and South
America, Africa, Asia and elsewhere. (They’ve still got you covered for
the United States, the United Kingdom and Europe.)
Under the Search tab, click Records to bring up a search form for a
person in indexed records. You can enter the first and last names and
the date range and place for one or more life events, such as birth,
marriage, death, residence (useful when looking for census records),
death or “any,” which could be, for example, an immigration or military
enlistment year. Narrow your search with names of the person’s parents,
spouse or another person who might appear with him in records. You also
can restrict your results to those from a certain country or of a
certain type (such as census or military records).
On the search results page, look to the left for fields where you can
adjust your search terms. Below that, you can use filters to narrow
your search by collection (which lets you limit results to one or more
databases), a birthplace in the record, a birth year in the record, and
more.
A camera icon in the far right column for a match indicates a digital
image you can download to your computer and/or add to your tree; no
camera icon means it’s an index-only record. In a few collections, due
to the wishes of record custodians, you must register with FamilySearch
to access record images or use the website at a FamilySearch Center
(also called a Family History Center; find one near by searching here online).
Some collections, such as the 1901 census of England and Wales, link to
a record image on a subscription site. You can view these with a
subscription or by visiting a FamilySearch Center.
Rick Crume
2. Set up notifications for family tree profiles.
As critics of FamilySearch will be quick to tell you, any user can
edit your family tree on the site. While a powerful tool for
collaboration, this functionality opens the door for questionable
details to be added to your hard-earned research.
To counter this, FamilySearch also allows you to receive
notifications when someone adds or edits details to an individual’s
profile. Simply click the star next to Follow when viewing a profile,
and the site will notify you when someone makes changes or adds records.
With that, you can get in touch with other users and (hopefully) keep
unsourced information from your tree.
Andrew Koch
3. Consistently browse record collections.
Searching a specific record collection that covers a place and time
your family lived can help you focus on the most relevant matches. On
FamilySearch, this technique also lets you access images of records that
aren’t yet part of the site’s searchable indexes. Under the Search tab,
click Records, then Browse All Published Collections to see a list of all records,
both indexed and unindexed, arranged by place. If “Browse Images”
appears in the Records column, none of the collection is indexed by
name. If that column gives a record count, the collection is at least
partially indexed. On the left, you can filter the list by name (enter
any word in the collection title), place, date, record type and image
availability. Click a title to search or browse that collection.
Rick Crume
If you’re not satisfied with your results on FamilySearch, check back
every so often and search again. FamilySearch is continually updating
its existing collections (and adding new ones!), so your search results
may change over time. Simply go to FamilySearch’s list of collections,
then sort by date updated.
Andrew Koch
4. Investigate individual collections.
Because FamilySearch has so many records, you can easily miss
important results if you only search on the site’s main form. Instead,
find individual collections that interest you and search them one by
one. From FamilySearch’s search page, you candrill down to collections from a particular place. Alternatively, search for a collection by title or (again) view a huge list of all FamilySearch’s collections.
Andrew Koch
5. Look for multiple kinds of records.
Censuses and vital records make up the bedrock of genealogy research,
but they shouldn’t be the only resources you look for. FamilySearch’s
database holds all kinds of genealogy records, from tax records to
probates to passenger lists. From the main search form, you can filter
by name of collection (which often includes record type). Also remember
to browse for records collections by location, so you can see what
FamilySearch has in your area.
Andrew Koch
6. Find relatives in the FamilySearch Family Tree.
Over the past few years, FamilySearch has been inviting the world to
contribute to what’s become the biggest community-based family tree
around. So far, over 5 million people have participated. Whether you contribute or not, you can still learn from this massive tree.
First, you’ll need to understand the community-based tree model. Like Geni.com and WikiTree,
the FamilySearch tree is a single, public tree. The idea is to promote
full collaboration instead of populating the site with millions of
individual trees that duplicate effort (but maintain control and
privacy). There are also dedicated spots to collaborate and contribute
personal memories.
There are drawbacks to this approach, such as when less-knowledgeable
researchers change well-supported data. But there are powerful upsides,
too. Not least, it’s easy for anyone to search the FamilySearch Tree
for specific ancestors to see what others have already discovered about
them. Ideally, among the 1.3 billion personal profiles, you’ll find
only one profile of any given ancestor, with all user-contributed data
neatly organized within: life events, relationships, sources, record
images, photos, memories. In reality, there’s some duplication, but far
less than you’ll find at sites with individual trees. And all data about
deceased individuals is public to anyone with a free FamilySearch guest
account.
FamilySearch Product Manager Ron Tanner talks about why you might want to participate in the Family Tree:
Sunny Jane Morton
FamilySearch Family Tree search strategy
To search the tree, look under the Family Tree tab and click Find.
You can enter a name; gender; dates of birth, christening, marriage,
death and/or burial; and family members’ names.
Adding your relatives to the tree can help you find their records, as
FamilySearch automatically searches its records for matches to people
in the tree. Click the Family Tree tab to start your tree and either
manually enter the information, or use “FamilySearch-approved” genealogy
software that can reconcile data between the family file on your
computer and Family Tree. Those programs include Ancestral Quest, Legacy Family Tree, RootsMagic and MacFamilyTree. To avoid duplicating people already in the tree, FamilySearch looks for a profile for each person you’re adding.
Click on an icon beside a name in landscape or portrait tree view for
research help. Record hints are blue, research suggestions are purple,
and data problems are red. Record hints and research suggestions also
appear under the Details tab in Person view. You can review and verify
possible matches, and attach the records to personal profiles.
Rick Crume
7. Use wildcard characters in searches.
By using wildcard characters, you can broaden your search to include
spelling variations. This ability is critical when researching records
that may have been poorly indexed or transcribed incorrectly.
Specifically you can use a question mark (?) to represent one missing
letter, and an asterisk (*) to represent zero or more characters. For
example, a search for Henders?n will return Henderson, Hendersyn, Hendersan and Hendersen.
Andrew Koch
8. Keep track of your searches.
If FamilySearch hasn’t recently updated a collection you’re
researching, you’ll want to avoid repeating your searches. To make the
most of your time, keep a log of your searches—what collection(s) you
searched, what terms and filters you used, and what results you found
(if any). This will keep you from doing the same work over again, plus
help you better plan your search strategy. We’ve got a free downloadable template.
Andrew Koch
9. Switch browsers.
If you have trouble viewing records on FamilySearch, then try looking
at them in a different browser. Some browsers play nicer with
FamilySearch than others. Simply copy and paste the URL into a different
browser window (such as Google Chrome, Firefox or Internet Explorer).
You may have to sign in to your account again, but doing so will
hopefully allow you to view the records correctly.
Andrew Koch
10. Experiment with match exactly.
In your searches, you’ll have the option of selecting Match All Terms
Exactly. A search with this option will return only results that match
the text in all fields you filled in. This can be a useful option if
you’re trying to narrow down your results, but this can also exclude
relevant matches that contain spelling errors or simply omit specific
details.
Andrew Koch
11. Visit a Family History Center.
Check with your local Family History Center
to see what resources they hold, as some records can only be accessed
at FamilySearch-affiliated physical locations. These repositories,
scattered throughout the world, often hold valuable records in book,
microfilm and microfiche formats. Staff members at the facilities will
also be happy to help you look for records, and may know key information
about local history and record sets.
Andrew Koch
12. Explore the FamilySearch Wiki.
Wikipedia for genealogy?! Yes! The FamilySearch Wiki
hosts nearly 100,000 articles to get you started (or help you break
through a brick wall) with your current research question. Like
Wikipedia, the FamilySearch Wiki is crowd-sourced, so its expertise may
be uneven and some pages may be outdated. It’s still a go-to resource
when it’s time to learn something new, especially about a really
specific topic.
For example, the FamilySearch Wiki has learning pages for countries
around the world, from Afghanistan to Zimbabwe. Most regions have
focused articles on specific states/provinces, counties and even cities.
Find articles on specific record types, such as U.S. probate records or Swedish household examination rolls. Need help reading Swedish (or other languages) or understanding genealogy terminology or abbreviations? There’s probably a word list you can use.
The following screen shot shows you a typical layout of a
FamilySearch Wiki page. See how it points you to related content you
might want?
A related how-to FamilySearch resource is more interactive: the FamilySearch Communities.
These are social hubs for people with common interests (think German
research) to exchange ideas or ask questions. Some questions may be
fielded by the experts at the venerable Family History Library in Salt
Lake City.
Sunny Jane Morton
13. Find family photos.
Under the Memories tab, see at a glance all the photos, stories,
documents, audio and albums you or someone else has submitted and linked
to your relatives. To search the Family Tree’s photos, stories and
documents for any term (such as a name, place or other topic), look
under the Memories tab and select Find.
Rick Crume
14. Broaden your location search.
Records weren’t necessarily kept in the same town in which they were
created. Study history, then identify where the records you’re looking
for are currently held, as this might affect where FamilySearch
categorizes them. For example, Austrian archives might hold records from
some parts of modern Romania, as Austria-Hungary controlled western
Romania until World War I.
Check the FamilySearch Wiki to determine what locations might have
the records you’re seeking. Then turn to the Search by Place section on
the site’s Search page to identify the relevant collections from that region.
Andrew Koch
15. Search user-submitted genealogies.
Individual family trees are still valuable, and many are accessible on another part of the site. The Genealogies
portal allows users to upload preservation copies of their personal
family trees, which remain intact. (Scroll to the bottom of the page,
then look at the right column to upload your tree file. You can delete
or replace it anytime.) Users can also search among millions of names in
these trees for their ancestors’ names, to see what others have learned
about them. When you open a search result, you’ll see the name shown
within the context of that tree.
Hear more about the Genealogies portal from FamilySearch’s Ron Tanner:
Sunny Jane Morton
Genealogies search strategy
Under Search > Genealogies, you can search the old Ancestral File
and Pedigree Resource File, two collections of family trees that
researchers submitted over many years. Pedigree Resource File includes
notes and sources, but Ancestral File doesn’t. Neither collection shows
the submitters’ names. It’s worth mining these family trees for clues,
but always try to verify the information with original sources.
A Genealogies search now covers several other collections, too:
Community Trees were an effort to cover the genealogy of entire towns or
communities. Oral Genealogies were obtained with personal interviews.
The International Genealogical Index (IGI) has information on 430
million ancestors contributed by members of The Church of Jesus Christ
of Latter-day Saints.
Rick Crume
16. Browse through the FamilySearch Catalog.
Speaking of the Family History Library, that research mecca is the
bricks-and-mortar partner of the FamilySearch website. As a
FamilySearch.org user, you’ll want to know this, even if you don’t plan
to visit the Family History Library anytime soon.
That’s because the Catalog of the entire Family History Library is searchable on FamilySearch.org.
Maybe you’d like to find an old atlas, the membership records of a
specific church or online deed indexes for your ancestor’s county.
Search the Catalog by place to explore what resources are available for
your locale of interest. If an item has been digitized at FamilySearch,
the Catalog likely points to it (though updates are still ongoing). Even
if the resource isn’t available online, you can click from that item’s
entry to see what other libraries may have a copy.
Sunny Jane Morton
17. Find microfilmed records.
It took years to digitize and index the massive holdings of
microfilmed records at FamilySearch’s Family History Library in Salt
Lake City. If you can’t visit the library, you can access the microfilm
that has been indexed online from the comfort of you own home.
Under Search>Catalog, run a Places search to find books and
microfilmed records about a place. Search on all the towns, cities,
counties, states and countries where your ancestors lived. Run a
Surnames search to find family histories. Note that this search covers
only surnames mentioned most often in a book, not every name. You can
search on multiple terms, such as a surname and a place, but you’ll
probably have better luck by entering these terms in the Keywords box.
18. Search digitized books in the FamilySearch Digital Library.
A lesser-known portal at FamilySearch is its Digital Library.
In addition to the shelves of the Family History Library, the Digital
Library offers titles made available by the Allen County Public Library
Genealogy Center, Midwest Genealogy Center, The Ontario Genealogical
Society and other major public and university libraries. Last time we
checked, the book count was nearing half a million titles.
The Digital Library is a good place to keyword-search ancestral
names, locations and the names of schools, churches, businesses and
other organizations connected with which your family. You may find local
histories, family histories, articles from periodicals and more.
Digital Library search strategy
Try searching on a name using the “Any is (exact)” option. To view a
match, you must download the entire book (a PDF file), then use your PDF
reader to search for the term in the book. Some digitized books can be
viewed only in the Family History Library or a FamilySearch Center.
Here’s a tip: You can search the collections of an individual
contributing repository. So if your family lived in Alabama or Texas,
for example, you might try running a focused search in materials from
the Birmingham Public Library or the Dallas or Houston Public Libraries.
Rick Crume
19. Look for indexes in imaged volumes.
Browsing an unindexed collection? Digitized volumes may contain
handwritten or typed name indexes. Look for a volume with “index” in the
title, and check the beginning and end of individual volumes.
Rick Crume
20. Search from a Family Tree profile.
FamilySearch can help you find records faster by filling in the
search form with details on someone in the Family Tree. In the person’s
Details view, look under the Search Records section of the right column
and select FamilySearch, Ancestry.com, Findmypast or MyHeritage. You can
attach a matching record from FamilySearch to everyone it pertains to
in the tree. Look for the link at the bottom of the record to “Attach
source to FamilySearch.”
Rick Crume
21. Get more help.
To find articles and videos about using FamilySearch, Click on the
question mark icon in the upper right, then search the Help Center by
topic. For example, search for Civil War, and the matches
include an article on South Carolina Civil War service records of
Confederate soldiers, videos on researching Civil War records and more.
Some information in this article appeared in the March/April 2017 (Crume) and September 2019 (Koch) issues of Family Tree Magazine. Last updated, November 2021.
By Diane Haddad
Black and white photo of a woman carrying a suitcase.
Genealogy travel requires a specific packing list, but you should be careful not to bring too much! Here are things I’ve found useful to bring (or not bring) when attending conferences and going to libraries over the years:
Research Materials
It doesn’t always work, but I try to carry around only the “stuff” I really need at the library, so I’ll have less to keep an eye on and can minimize fumbling around. Usually I have:
my phone to access my tree, attached records and research log (I download any important documents to my phone in case I can’t get a signal at my destination).
a little purse with my phone, a flash drive for digital copies, bills and change for copiers or copy cards
a pen or pencil and a notebook with my prioritized list of materials I need to find, with pertinent notes about the people I’m looking for
depending where I’m going, maybe a tablet in a computer bag, but I do tend to be more of a paper-and-pen note taker
The Essentials
Extra layer. No telling whether a conference classroom or library will be sweltering or over-air-conditioned, so bring a sweater.
Extra bag. “I wish I had another bag” is a common comment by genealogists who pick up freebies and make purchases from Family Tree Magazine at conferences. Carry an extra tote bag around with you for purchases, handouts, syllabi, etc.
Small comforts. Other things you might wish you had include hand sanitizer, tissues, a bottle of water (concessions can be pricey), address labels (for entering prizes at a conference), Dramamine (to help with microfilm reader motion sickness), your headache remedy of choice, gum (for a conference; it’s usually a no-no in libraries), and more-comfortable shoes.
Drink and a snack. I rarely want to stop my research to go get lunch, and sometimes there’s no place to get lunch even if I want a break. You can leave water and a granola bar in the car for consumption outside, if there’s no snack room.
Knowledge from the locals. If you’re going to a repository, cemetery or conference that’s new to you, ask local genealogists what you should know before you go. You might get inside info on the best place to park and eat lunch, staying safe, or a librarian who’s especially knowledgeable in your research area. If you don’t know anyone to ask, a genealogy pal might be able to put you in contact with a helpful person, or you could friend the local genealogical society on Facebook.
Things to Remember
Early-bird mindset. If you want to sit somewhere in particular for a class, arrive early to secure your spot. For some speakers, such as Elizabeth Shown Mills or Tom Jones, it’s a good idea to arrive early if you want to sit at all.
Only what’s allowed. Visit a repository website ahead of time for info on what you can bring inside, whether you can use a cell phone or digital camera to photograph records, and how you’ll make copies (such as on a photocopier or scanner). Also double-check hours, any special closures, and whether materials are pulled from storage at particular times.
Back-up plans. Plan where you’ll park, and where you’ll park if you can’t find a spot there.
Signatures can be precious mementos of your loved ones—and crucial
clues as you research records. In addition to using handwriting in
research, you can also display your ancestors’ signatures in a way that
shares and celebrates your heritage. These easy signature projects will
help you display your genealogy.
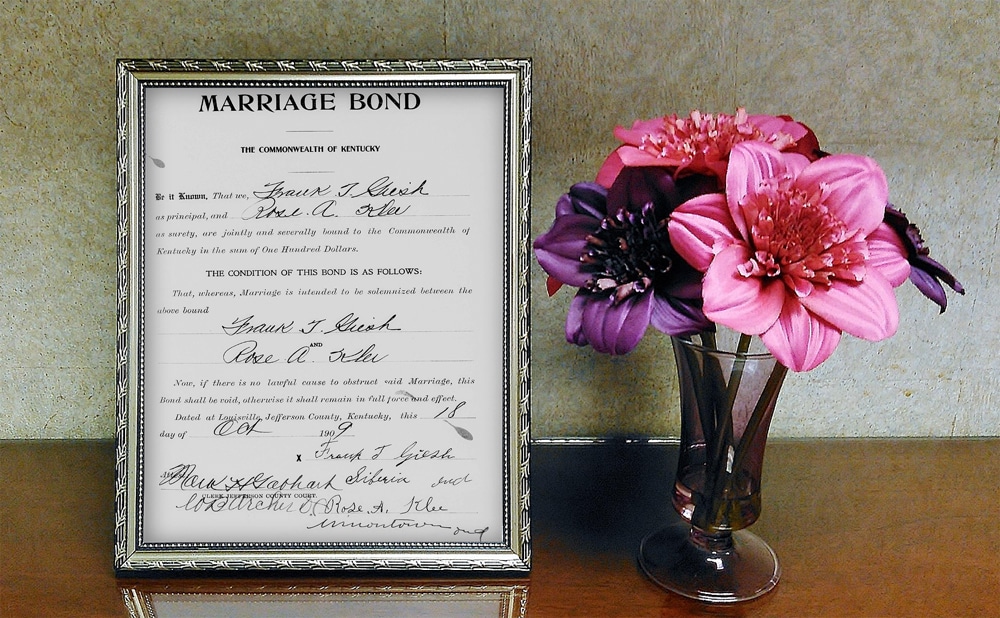
1. Frame a record
Create simple artwork by printing and framing records that include
your ancestor’s signature. Display the frame in your home, or gift it to
a family member.
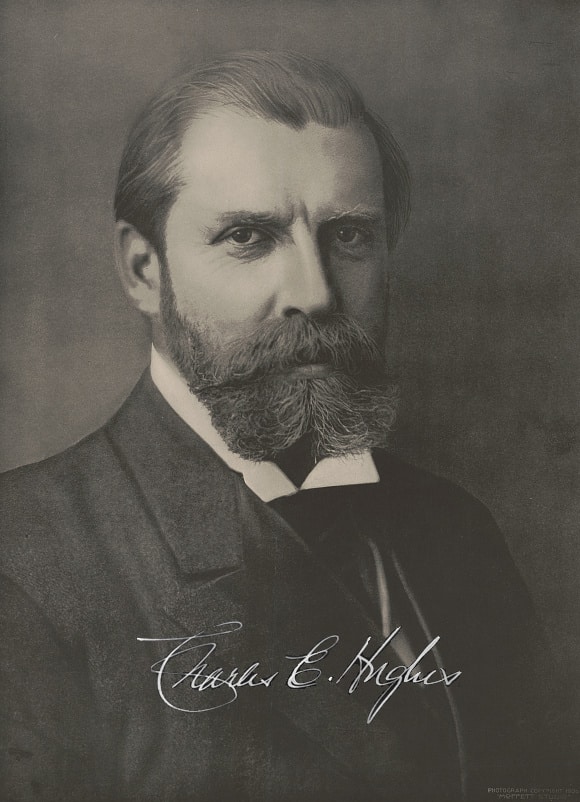
2. Overlay a signature on a photo.
Use photo-editing software to place an ancestor’s signature over a picture of him. Free websites such as Canva work nicely, as do more sophisticated photo-restoration software like Adobe Lightroom or Photoshop. This creates a meaningful connection between your newfound record and a cherished photograph.
3. Add to a scrapbook or photo album.
Print out a few signatures that you’ve discovered and paste them
alongside photographs, printouts or other memorabilia in a collection.
Like other historical images, signatures make great additions to
online family trees and software programs—particularly in lieu of photos
of your ancestor himself. “I create these lovely signature silhouettes
for ancestors that I do not have photos for,” says Amberly Beck, who
writes about family history on her blog The Genealogy Girl.
“I share them with my nongenealogist family members in a special
private photo album on Facebook, [and] I also add them to FamilySearch
and my Ancestry tree so other family members can find and enjoy them.”
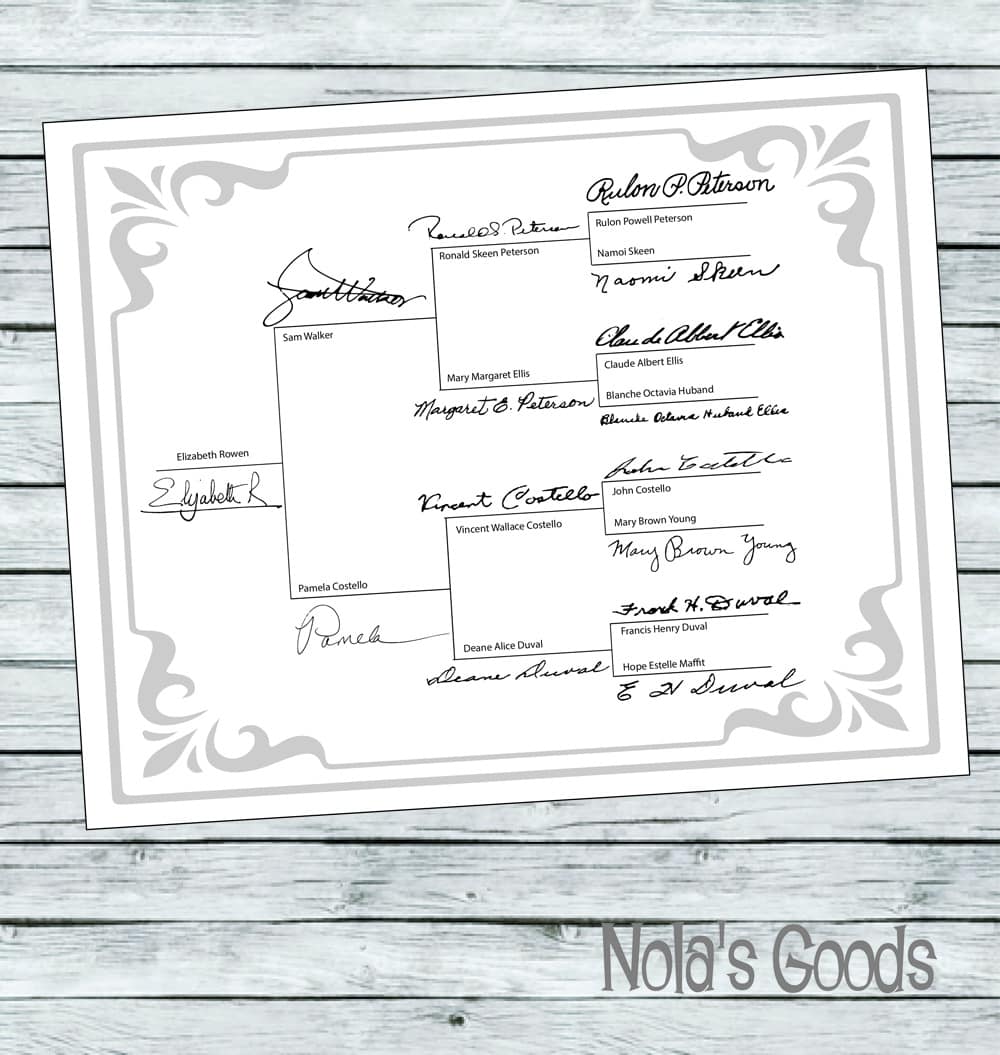
5. Create a signature pedigree chart.
Signature pedigree charts can be a great way to combine your
research with a gift or family history display. This one comes from nolasgoods on Etsy.
Instead of typing or hand-writing your ancestor’s name, place her
signature on a family tree. You can order pedigree surname charts on Etsy.
These can make great gifts for genealogists and nongenealogists
alike. Beck received one from her sister for Christmas. “When I opened
the gift, I was overwhelmed! I know each of those people so well from my
years of work researching every detail of their lives and preserving
their photos, letters, and other treasures,” she says. “Seeing all of
those signatures arranged as a pedigree was emotional and deeply
meaningful.”
Here’s a confession; I love gadgets. If you’ve ever wondered who in
the world needs all of these fancy tools to be productive, it’s me. If
it’s shiny and needs to be charged, I probably want it. When I’m working
on my genealogical research, though, my most useful tool doesn’t have a
cord, an extended warranty or a hefty price tag. The one tool I’d be
lost without is my genealogy research log.
When I was a brand-new genealogist, more seasoned researchers told me I needed a log,
and I scoffed. Then I spent years doing the same work over and over,
because I wasn’t keeping track of my efforts. Now I face far fewer brick
walls because I’m able to move my research forward instead of going
around in circles.
Research logs help you see what you’ve done, what you need to do and
where to go next. If you take a break from your research for a few
months (or years), you’ll be able to pick up where you left off. These
days, I never do any genealogical work without my research log.
In the olden days (1995), my research log was on paper. With today’s
technological advances, I think a research log is more useful if it’s
electronic, but pen and paper are always an option. A computer-based
research log is easy to find, and you can add to it forever. It doesn’t
waste paper or printer ink, and modern automatic backup systems and cloud-based storage can help ensure that it’s available even if disaster strikes.
I encourage you to overcome the idea that a research log is too much
work. Once you’re past the learning curve of a new system, your log saves valuable time better spent breaking down your brick walls and finding new ancestors to add to your family tree.
Make sure your genealogy research log includes these six key details:
1. Date of research
Captain Obvious, you say? A lot of people don’t realize how useful
the date of research can be. New records are being digitized all the
time, so assessing how long ago you looked for something and didn’t find
it can help determine when it’s time to try again.
For example, my research logs from 2014 contained notes indicating
that my ancestors’ church records in Norway weren’t available online.
The date prompted me to try again. When I did, I was rewarded with two
generations’ worth of new discoveries.
Dates can also help you spot patterns in your research cycle. You can
choose when to subscribe to certain websites so you can pay for them
when you’ll actually use them. My research logs tell me I tend to work
on my own family tree more in the summer, when hot weather keeps me
indoors with the air-conditioning. So I can budget for genealogy website subscriptions in the summer months, when I’ll get the most value for my dollars.
2. Full source citations
I know—source citations aren’t that much fun. You feel like they’ll
slow you down, and you promise you’ll go back and do them later, right?
Odds are you won’t. Do your future self a favor and create source citations
right then and there. Doing so will prevent that awful feeling when you
realize at the end of a research trip that you don’t have a page
number, author’s name or other key detail. You’ll also have everything
ready for the day you write up your research conclusions (which increases the odds that you will do those write-ups).
I’ve also found that it’s easier to learn how to do citations quickly
and correctly if you do one every few minutes. The quick repetition
really helps your brain to learn a new skill.
You think you’ll remember that exciting record forever, but odds are
you won’t. When you’ve been working on your family trees for decades,
you’ll be amazed at how quickly today’s research details fade
from memory. Beyond the basic outline of what you find in a particular
document, what else will you record? Does a witness name ring a bell?
Does the document spur new ideas? Put all of it in your research log.
There’s no such thing as too much information here.
If you’ve discovered a resource that might be handy later on, copy
and paste the URL into your research log. By copying and pasting the URL
you avoid introducing typos. That will allow you to come back to it
with a single click.
4. Keywords that relate to the search
Your research log’s data is only useful if you can find it again.
Many family historians struggle to find a digital filing system that
works for them. Your filing system doesn’t have to be perfect, and this
is where adding keywords can really help.
If you’re not yet sure of the spelling of a newly discovered
ancestor’s name, add all of the spellings you can think of to cover your
bases. For example, if you’re working on a woman whose maiden name is
still a mystery, include text with her husband’s name, the town she
lived in or other identifying details. This will save you from having to
wade through every “Mary” on your computer when you’re looking for this
Mary.
In some families, even full names aren’t that helpful. I have German
ancestors who reused the same names over and over. My Norwegian
forebears were worse; they used patronyms, which changed each
generation.
In order to keep them straight, I’ve developed nicknames, and I tag
each research log entry with the nickname. This helps me not confuse Milwaukee Fred with Railroad Fred or Dead Fred.
(Of course, they’re all dead. But “Dead” Fred died very young, and had
his name passed along to the next child—a common practice among
Germans). I also have a string of Nels Nelsons, so Civil War Nels is labeled differently from Norway Nels (who lived in the Old Country) and Minnesota Nels (who was born in—you guessed it—Minnesota).
Some people use ancestor numbers assigned by their desktop genealogy
software as unique keywords for each ancestor. Do whatever helps you
find the right person.
5. Expenses
Your research log is a great place to keep track of costs when you
send a request for a death certificate or pension file. Whether you’re
on a strict budget or not, it’s smart to track your spending and to stay within bounds.
Recording those costs can also provide some accountability, so you
don’t accidentally go on a late night record-ordering spree and blow
your budget for the year in one fell swoop. (I’ve done that, and I don’t
recommend it.) It’s helpful to look back and see how much a particular
record cost the last time you ordered, so you can better prioritize what
to order next.
If you’re researching records in a particular area, you probably have
an ancestor who lived there. And if you have one ancestor in an area,
you’ll probably find that you have more.
Consider what information might be useful to you when you have to
return to this spot. Did you just learn that the county line moved in
1846? Put that in the log. Did the street numbering system change? Is a
database you’ve found picky about having surnames capitalized for
searching? Save your future self grief by making note of it all.
A version of this article appears in the May/June 2019 issue of Family Tree Magazine.
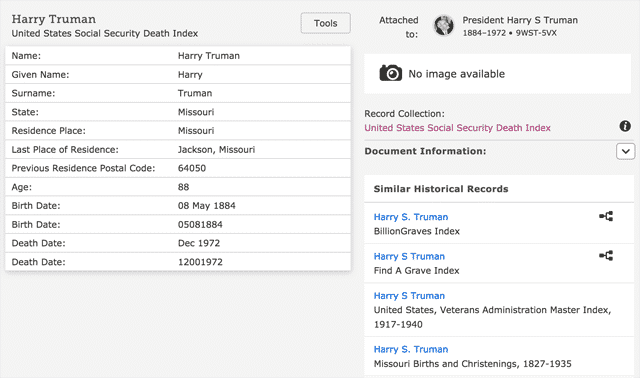
Looking for a totally free database of US death records? The Social
Security Death Index (SSDI) is a valuable record set created from the
Social Security Administration (SSA)’s Death Master File to track tax
withholdings and Social Security survivors’ benefits. Here’s what the
Social Security Death Index is, how genealogists can use it, and where
to find it online.
Who is in the Social Security Death Index?
Though it doesn’t include every person who ever had a Social Security
number, the SSDI generally includes all deaths reported to the SSA
beginning in 1962 (though a few include deaths prior to that year). At
time of writing, the SSDI cuts off at 2014.
What Details are Included?
The SSDI isn’t as detailed as some other Social Security documents, such as the SS-5.
But you should still find the person’s full name, birth date, death
date, state where the number was issued, and last known residence (down
to the ZIP code level of detail). You may also find the person’s Social
Security number.
Where Can I Search the SSDI?
The SSDI is widely available on genealogy websites—you don’t need to
request transcripts from the SSA. Some websites include additional
details in their SSDI databases that can help when you’re trying to
distinguish between similarly named individuals.
You can also search at Ancestry.com, but you’ll need a subscription. To search the SSDI across multiple websites, visit Stephen P. Morse’s webpage.
Tips for Searching the Social Security Death Index
It’s only fair to warn you that SSA indexes (including the SSDI) are
not always complete or accurate. You might see any of the following:
Initials, nicknames or middle names instead of full names
Birth dates appearing only as a year, or not at all
Names or dates that are entered incorrectly, such as 2 November (11/2) instead of 11 February (2/11)
Names that drop internal punctuation: OMalley or Omalley instead of O’Malley
Women’s paperwork filed under an unfamiliar married or maiden name (you may not have found every surname she used)
Unfamiliar
places of issue, residence or last known benefit (people could apply
from anywhere, and you may not know every place they lived)
If needed, run several searches with different combinations of names,
dates and places. Explore all possible results, even partial matches.
It may take a while to accumulate enough bits and pieces of
evidence—from Social Security or other documentation—to identify a
correct entry.
A Family Tree Magazine reader wrote in, asking, “My daughter
has to interview her grandparents for a school project. Do you have any
suggestions for questions she can ask?”
Not only do assignments such as this one bring families closer,
they’re also a great way for kids (and their parents!) to learn about
their family history and history in general. And a reticent subject may
be more likely to open up when the interviewer is a grandchild. Of
course, these questions can be asked to any relative — not just
grandparents!
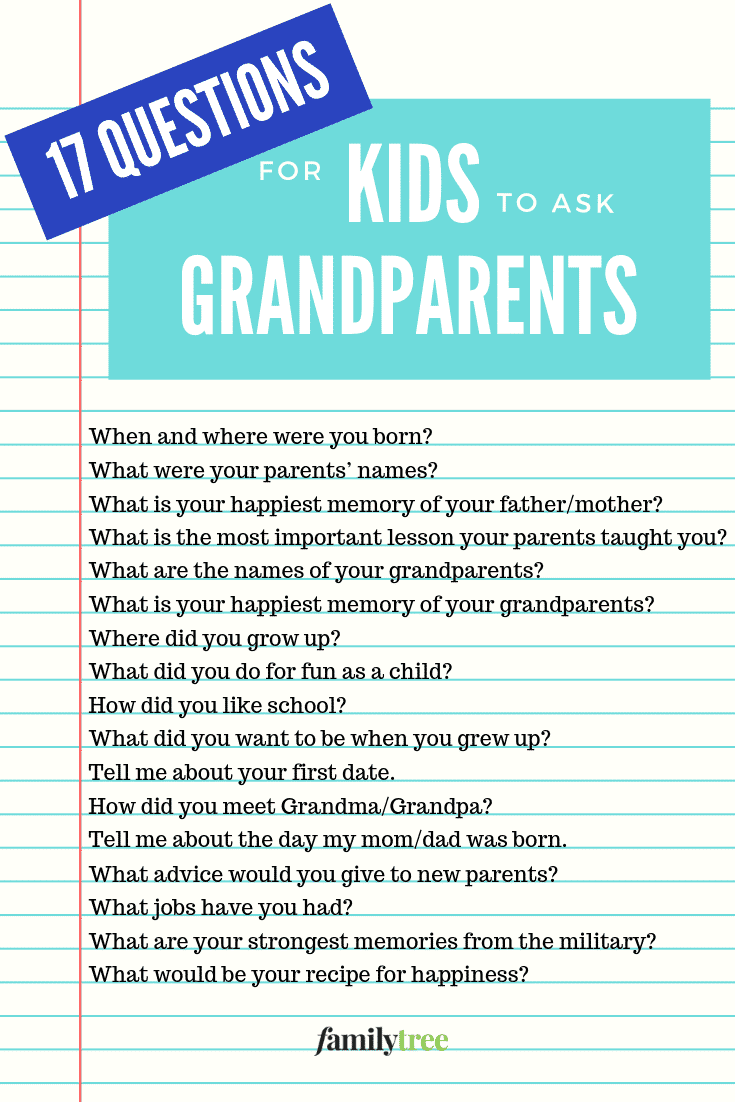
17 Family History Interview Questions
When and where were you born?
What were your parents’ names?
What is your happiest memory of your father? Your mother?
What is the most important lesson your parents taught you?
What are the names of your grandparents?
What is your happiest memory of your grandfather? Grandmother?
Where did you grow up?
What did you do for fun as a child?
How did you like school?
What did you want to be when you grew up?
Tell me about your first date.
How did you meet Grandma/Grandpa?
Tell me about the day my mom/dad was born.
What advice would you give to new parents?
What jobs have you had?
What are your strongest memories from your time in the military?
What would be your recipe for happiness?
Using family interviews to learn historical lessons
You and your daughter can edit the list together based on the length
of the interview, what your daughter wants to ask about, and any project
requirements (for example, her teacher may want her to focus on a
particular topic such as military service).
Your daughter may want to jot down significant historical events that
occurred during her grandparents’ lives, such as the Great Depression
or the day President Kennedy was assassinated. Then she can ask about
them with a question such as, “What’s your most vivid memory of growing
up during the Great Depression?
If she’s been learning about the Great Depression in school, she’ll
see how it affected everyday people and maybe even find herself an
answer to that perennial question, “Why do we have to learn this?”
She also might be interested in how her grandparents’ childhoods
compare to her own: Did they have similar hobbies? What chores did they
have to do around the house? How did they like their brothers and
sisters?
If you ask it, the answers will come
Use a question list as a guide, but it’s OK if the conversation leads
your daughter to ask questions not on the list, or her grandparents to
tell stories not related to a particular question. Looking at old family
photos may spark her grandparents’ memories, too.
Make sure you record the interview for posterity (and in case your daughter needs it for a report) using a digital voice recorder or an app on your smart phone.
If filling in a family tree chart is part of the homework, browse our collection of free downloadable forms. Your daughter’s grandparents would probably love to see the finished project.
Pin this article for later!
Check out our Pinterest page for more interview questions and kid-friendly family history projects!
By Diahan Southard
Triangulation is a strategy genealogists can use to determine how genetic matches are related.
Triangulation is a broad term with application in many fields, from
psychology to politics. In genetic genealogy, triangulation mirrors the
process used by surveyors, who employ multiple triangles to help deduce
the exact landscape of a particular area. Here’s how to use
triangulation to your advantage when analyzing your DNA matches.
Genetic genealogists create triangles from groups of three autosomal
DNA matches to get a better picture of how each member of the group is
related to the others. Commonalities among the three individuals’ family
trees may indicate shared ancestors. For example, if two group members
have common Smith ancestors in Colonial Massachusetts, the third group
member—who perhaps hasn’t yet reached that far back in her tree—might
theorize she’s also connected to the Smiths and turn to traditional
genealogical records to investigate.
You don’t have to be a DNA expert to start using triangulation to
your advantage. You just have to have autosomal DNA test results from
one of the four major testing companies (23andMe, AncestryDNA, Family Tree DNA or MyHeritage DNA),
a known cousin with autosomal test results, and some shared matches.
We’ll show you how to triangulate your way to family tree success.
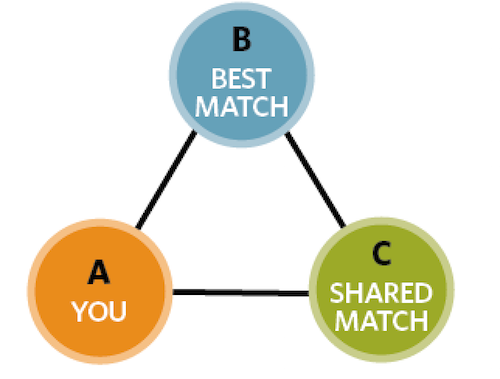
How to Triangulate DNA Matches
While the triangle used to play music and the triangle giving you
trouble in math class are very different from the genetic genealogist’s
triangle, there are some definite similarities among them: Without fail,
every triangle has three sides, connected at three points. Let’s
discuss each point in the DNA triangle and how to identify it.
Point A
The first point is you (you’re already a third of the way
there!). What makes you the perfect starting point? Well, it’s your DNA
of course—your autosomal DNA, the stuff that came half from mom and half
from dad. Of your enormous DNA record, the testing companies evaluate
about 800,000 pieces. Now stop for just a second to appreciate the
strength of your position on this triangle and the significance of those
800,000 pieces. They can identify you uniquely, apart from everyone
else in the whole world. Not only that, but these pieces of DNA also form a kind of map of your ancestors and your ancestry.
Think of your DNA as various points scattered across time and space,
outlining the vast landscape of your heritage. Contained in your very
own DNA is a record of the places your ancestors lived, their families,
and even their secrets.
The trick, of course, is to convert that system of dots into a
network of information that you can use to discover your past. This is
one of the greatest strengths of genetic genealogy—the ability to find
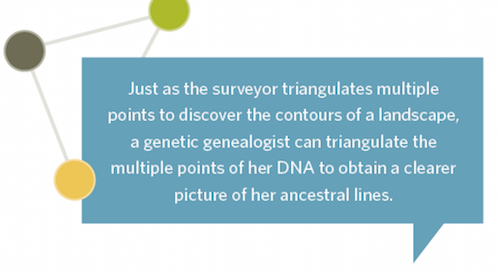
records that were previously lost. Just as the surveyor uses
triangulation of multiple points to discover the contours of a
landscape, a genetic genealogist can use the multiple points of her DNA
to triangulate with others and obtain a clearer picture of her own
ancestral lines.
Point B
The second point on your triangle is any other person on your match
list. Remember, individuals who show up on your match page are there
because they share DNA with you. That shared DNA means they also share
an ancestor with you.
The
three points on a genetic genealogy triangle are (A) you, (B) a close
genetic match and (C) a match whom you and your close match share.
Now, not all matches are created equal. You want what we’ll call a
“Best Match” to occupy Point B on your triangle. Generally, you’ll
usually find your Best Matches on the first few pages of your match
list. See the box on page 26 for steps to evaluating which matches are
your best to use for triangulation.
Point C
With so many possible connections, it’s easy to see why you need a
way to narrow your search. This is where the third point on your
triangle comes in. When you add a third person with his genetics and
genealogy, you harness the power of triangulation to help you discover
which of the eight great-great-grandparent or 16 third-great-grandparent
couples are the most likely connecting point for you and your two
matches.
To find Point C on your triangle, you need a match with specific
characteristics. Point C needs to share DNA with both Point A (you), and
Point B (your Best Match). You can find that person most easily using a
tool provided by your testing company.
At 23andMe, you’ll find candidates for Point C under a heading on Point B’s personal profile page called Relatives in Common.
On your Family Tree DNA match list, check the box next to Point B and then click on the In Common With button.
At AncestryDNA, you’ll find this list under Point B’s profile page by clicking the Shared Matches tab.
At press time, MyHeritage DNA had a tool for viewing shared matches in the works.
Use this tool to find a list of Point C candidates on your match
page, as well as the match page of Point B. So if all three of you share
DNA, there’s an excellent possibility that you all share a common
ancestor.
This, my fellow genetic genealogists, is the crux of triangulation:
Each person on this list of shared matches becomes Point C on your
triangle. Just by using the shared matches tool, you now have multiple
triangles, all with you, Point B, and then the list of shared matches
vying for Point C. With your shared match list in hand, you can evaluate
the genealogies of all of the shared matches for similarities. If you
can find out how they’re related to each other, then you’ll have a good
idea how you might be related to them.
That’s all good, but how do you use triangulation in your research?
Let’s look at two case studies to explore different ways you can apply
this method to your genealogy.
Case study No. 1: Triangulating known cousins
In an attempt to use the principles of triangulation to identify his
mystery maternal grandfather, Edward has tested multiple cousins on his
mom’s side and his dad’s side. Anytime a new match shows up on his match
list, he can use triangulation with his known cousins to help him
figure out if the match is related to this grandfather and thus might
help solve the question of his identity.
Recently, a man named Victor showed up as a new second-cousin match
to Edward. This means that Edward is Point A and Victor is Point B. To
find Point C, we used the shared matches tool to find others who have
DNA in common with both Edward and Victor.
Unfortunately, all the Point C matches were on Edward’s paternal
side, meaning Victor was just another paternal match, and not someone
who could help him find his mystery maternal grandfather.
But still, Edward was intrigued. He thought he knew all his paternal
second cousins—but who was Victor? Through further comparisons and
triangulations, Edward discovered that Victor shared more cMs with one
cousin, Peter, than any other. Using the number of shared cMs and doing
further research eventually showed that Victor’s mom was Peter’s half
sibling. Victor may have eventually figured this out on his own, but
Edward, with his network of known tested cousins, was able to put it all
together relatively quickly using triangulation.
In Edward’s case, you can see that triangulation with known cousins
can help you place your close matches into particular ancestral “bins,”
making it relatively easy to at least identify which parent or
grandparent the match belongs to. Next, let’s explore the principle of
triangulation in a situation where we don’t have the benefit of so many
known tested cousins.
Curious about how to determine the amount of shared DNA
across multiple relatives? Follow these tips and you’ll have it
calculated in no time!
Case study No. 2: Looking for fourth-great-grandparents
Richmond Virginia Claunch, my third-great-grandfather on my dad’s
side, was born in Texas in 1860. My best theory about his parentage was
that … well, I think he … OK, I had absolutely no idea. So I turned to
my autosomal DNA matches. Any DNA I have from Richard came through my
dad, and Dad has more of Richard’s DNA than I do. Therefore, my dad will
represent me at Point A of our triangle (I’ll still talk about this as
my point, just to make things easier). For Point B, ideally, I want
someone who descends from a different child of Richmond than my dad
does. That means the shared DNA comes from Richmond or his wife, Lilly.
But I wasn’t in touch with any of my dad’s third cousins. So instead
of a known cousin, I needed to find a Best Match—remember, that’s my
closest genetic match who also shares a genealogical element of
interest, such as a surname or location. So I searched my autosomal DNA
matches on AncestryDNA (you can do this at the top of the View All
Matches page) for matches with the surname Claunch in their
family trees. I found several matches, all candidates for Point B on my
triangle. Looking through posted pedigrees, I found a match with the
user name RS, whose tree shows he’s a descendant of Richmond and Lilly’s
daughter Bessie Claunch. Perfect! (If I hadn’t found this match, I’d
look for a match with Claunch relatives from Texas.)
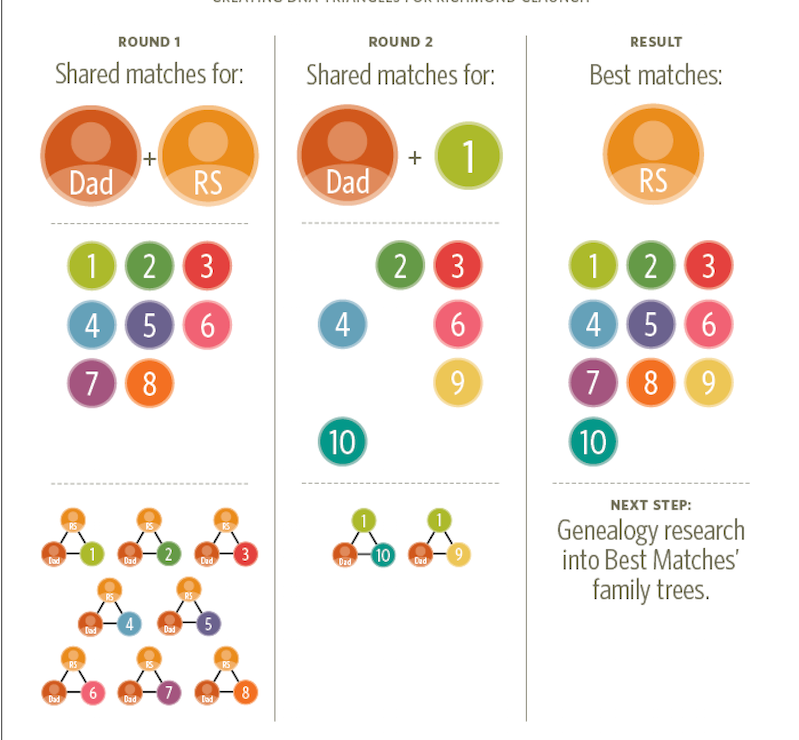
Now I had Point A (my dad) and Point B (RS), and all I needed was
Point C. To find it, I viewed the shared matches between RS and my dad.
There were eight, as shown in the illustration on the next page. Any of
these people could be placed at Point C on the triangle. In fact, I
actually created several triangles to form a “Genetic Network.” Here’s
how:
My dad + RS + each of the eight shared matches = 8 triangles.
My dad + No. 1 of those eight shared matches + the two new people who
shared matches with both my dad and No. 1 (but not with RS) = 2 more
triangles. These people are numbers 9 and 10.
Creating DNA Triangles for Richmond Claunch
As I looked for candidates for my Richmond Claunch triangle, I noted
that match No. 1 doesn’t share DNA with Nos. 5, 7 or 8, all of whom do
share DNA with RS. Remember that RS descends from Richmond and Lilly’s
daughter, so he has both Richmond’s and Lilly’s DNA. This probably means
that match No. 1 shares DNA with either Richmond or Lilly. Examining
the family trees of Nos. 5, 7 and 8 reveals the Harvey surname in No.
7’s pedigree. Lilly’s maiden name was Harvey. To further check out this
connection, I can triangulate my dad and No. 7, looking in No. 7’s
shared matches list for Nos. 5 and 8. Sure enough, they’re in there.
This initial analysis suggests that Nos. 5, 7 and 8 are related on
Lilly’s side, not Richmond’s. Genealogy research can confirm this
theory.
If
you track who in your genetic genealogy triangles shares DNA with whom,
you might be able to identify important details about how your matches
are related to each other.
Now I can make a new “Best Match” list (shown in the third column on
the opposite page), composed of test-takers who share DNA with both me
and someone else (RS) I have reason to believe is related to Richmond or
Lilly, and therefore are prime sources of information. The next step is
to do genealogy, looking at the online pedigrees of these Best Matches
and trying to figure out how they’re related to each other.
If a person doesn’t have a tree linked to his or her results, search
for the user name to see if you can find one that isn’t linked to the
DNA results. Also see if the person has posted a tree under that user
name at other family tree websites.
Look at names of ancestors first, and then at locations of birth and
death. If you can figure out how these matches are related to each
other, you can be reasonably certain that their common ancestor also is
your ancestor. I noticed that a few of my Best Matches share the
ancestor Joseph Claunch, who was born in 1803 in Tennessee and married
Anna Carter. To determine how this Joseph and Anna might fit into my
pedigree, I need to examine the genetic relationship of his descendants to my dad, and the genealogical relationship of each match to Joseph.
Let’s take another of my dad’s matches, DV. Joseph is DV’s
third-great-grandfather. If Joseph were also my dad’s ancestor, DV and
my dad would be fourth cousins. Their predicted genetic relationship,
based on shared cMs, is fourth cousins, so this genealogical hypothesis
fits. Two more matches, both genetic and genealogical fourth cousins,
further corroborate this story. Looking at the genealogy, my Richmond is
in a good position to be Joseph and Anna’s grandson. Since he carries
the Claunch surname, he’d have to be the son of one of their sons. With
that in mind, let’s turn to the genealogy and see what we can find.
Joseph is in the St. Clair, Ala., census in 1840, but it gives ages
and genders of household members—no names. The family is in the same
place in 1850, but several children are already grown and gone. Although
I haven’t yet figured out exactly who Richmond’s parents are,
triangulating my dad’s DNA matches has given me several avenues to
research: Joseph and Anna had sons I still need to investigate. I can
extend the pedigrees of other genetic matches in my Best Matches list to
see where they lead. Another group of triangulated genetic matches
within my Best Matches have a Claunch ancestor in Virginia who ended up
in Alabama, so I need to take a closer look at that line. Importantly,
from the combination of genetics and genealogy, I know that my Claunches
are associated with Claunches in St. Clair, Ala., and later in Red
Rock, Texas.
The simple process of identifying two other people to occupy points B
and C on your triangle, and using them to create a list of Best Matches
from which to draw more information, is really all there is to
triangulation.
Some genetic genealogists take this idea of triangulation a step
further. Instead of simply using a shared matches tool to gather others
for Point C, they compare actual chromosome data. This extra step
requires a tool called a chromosome browser (the GEDMatch website
<www.gedmatch.com> offers one, as does Family Tree DNA), which
lets you visualize the DNA you share with someone. Some people like to
look for shared DNA segments as evidence of a triangulated relationship.
You might hear them say, “We all share a segment on chromosome 11, and
so we must all be cousins!”
Viewing chromosome data can be fun, but it certainly isn’t necessary
for triangulation success. All that matters is that you share DNA, it
doesn’t really matter where that piece of DNA is on a chromosome. So
don’t worry if you aren’t into spreadsheets and raw data. You can
triangulate if you follow the simple shape of the triangle and its three
important points.
Your best matches—the ones who make the best candidates
for the points on your genetic genealogy triangles—are the ones who
share the most centimorgans with you.
Using Centimorgans
Centiwhats? Centimorgans are how we measure your pieces of DNA.
It isn’t quite as simple as an inch or a centimeter, but for our
purposes, you can think of centimorgans that way. Your testing company
tells you how many total centimorgans (cMs) you share. This number can
come in handy when you’re trying to figure out how closely you’re
related to someone based on a relationship range, such as “2nd to 4th
cousins.” These three steps will help you use the total number of cMs to
better understand your relationship to someone.
1. Find the total number of shared cMs for you and your match
At MyHeritage and Family Tree DNA, the number of cMs is shown on the
main match page. It’s there for 23andMe as well, but shown in percentage
form (to convert, multiply your percentage by 68, for example: 3.125 x
68=212.5 cMs). At AncestryDNA, click on the match you’re interested in,
and then click on the little question mark under the relationship range
to see the total number of shared cMs.
2. Look up that number in a table
Blaine Bettinger spearheaded the Shared cM Project to gather
statistics on cMs real genealogists share with their known relatives.
The result is a range of shared cMs for each relationship (sibling,
first cousin, aunt/uncle, etc), with an average number of cMs the
relatives are found to share. For example, first cousins on average
share 880 cMs; second cousins, 245; and third cousins, 89. Examine the
full table at the Genetic Genealogist for relationships that fit your genetics.
3. Check the genealogy of the match
Let’s say you and your match share 87 cMs. You decide, based on the
testing company’s predicted relationship and the number of shared cMs,
that you and your match should be third cousins. Traditional third
cousins share a set of great-great-grandparents. That means you need to
look at your match’s eight sets of great-great-grandparents to see if
you can figure out which is likely to be your connecting ancestral
couple.
Many people, though, don’t know the names of all their
great-great-grandparents. And even if they do, “uneven” generations
(i.e., a couple having a child at an unusually young or old age) can
lead to ancestral connections that aren’t in the exact generation you
expect them to be in. So instead of looking for your common ancestor
among the eight great-great-grandparent couples, you may need to look
for them in your match’s 16 third-great-grandparent couples. If you
can’t find a common ancestor, look for surnames and places that match
those in your tree.
Tip: On AncestryDNA, other test-takers
can now share their results with you, allowing you to view their match
lists as you would your own matches.


