An ongoing journal of the history of the Bolles Family. From the first settler, Joseph Bolles of Wells, Maine in 1640, all past and present facts, thoughts, events, research and items of interest on this and allied families.
A: There are traditionally three reasons people use GEDmatch: to find new matches, to use the tools, and to see segment data.
In the early days of autosomal DNA testing we had only three companies in play: AncestryDNA,
Family Tree DNA and 23andMe. If you wanted to compare your results with
someone who had tested at a different company, of just see if you had
matches in a different company, you had to actually test at that
company. Back when prices were $200 or $300 per test, that could get
really pricey really fast. But then GEDmatch entered the scene in 2010
and offered us a FREE way to see matches who had tested at other
companies. As long as you didn’t mind the rigmarole of downloading your
data from one company, and uploading it into GEDmatch, it provided the
perfect solution to our problem.
However, now that testing prices have plummeted, to even as low as
$49 per test, testing at multiple companies is not necessarily out of
budget. For those who still don’t want to shell out the extra cash, you
can transfer into Family Tree DNA, MyHeritage and Living DNA and have
full access to your match list for free! This means if you test at
AncestryDNA or 23andMe, then transfer to the three just mentioned, you
can be in 4 of the 5 genetic genealogy databases for just under $100.
But even if you aren’t in all of the companies, will you find new
matches at GEDmatch? It is unlikely. If someone was genetic genealogist
enough to transfer to GEDmatch, it is very likely that they also
transferred to either FTDNA, MyHeritage or LivingDNA as well, right? So
you can just find them at those companies without using GEDmatch.
But what about the tools?
GEDmatch does have a couple tools you won’t find in your testing
company. A powerful tool for those seeking unknown parents (or others
just out of curiosity) is the Are My Parents Related tool. GEDmatch also
provides lots of different views of your ethnicity based on different
algorithms. You can also discover what color your eyes are likely to be
(in case you don’t have a mirror).
The biggest tool genetic genealogists feel they need from GEDmatch is
the segment data that AncestryDNA is not providing. Aside from the fact
that you don’t actually need segment data to determine a relationship,
in order to get it you have to also convince all of your DNA cousins at
Ancestry to transfer to GEDmatch as well.
So, while GEDmatch used to be a great place to meet and greet new
cousins, much like the drive-in, its day has passed. Currently GEDmatch
has a very different purpose: to help solve violent crimes. Regardless
of your position on this topic, it is very important that we reeducate
everyone in the community about the new purpose of GEDmatch, just to be
clear about what new users are signing up for.
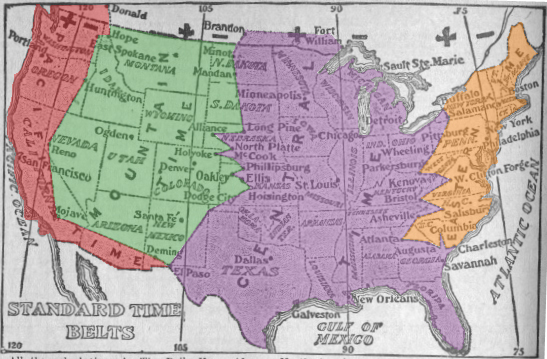
The Standard Time Act in 1918 formally established four US time zones. This map (courtesy Wikimedia Commons and colorized by user:OwenBlacker) shows the railroads’ time zones five years earlier, in 1913.
Sick of having to change your watch when you travel? Puzzled as you make phone plans with family
across the country? You’re not alone. On March 19, 1918, the US
Congress passed the Standard Time Act, officially establishing the four
time zones we have today and ending the “wild west” days of time
management.
Let’s take a look at a brief history of time zones in the United
States. The time zone map above shows the four zones as they were just a
few years before their official adoption.
How Railroads Created Time Zones
Railroad companies
first created time zones as a way of regulating schedules for their
trains. Before the railroad boom of the 1800s, each town kept its own
standard time, often based on the position of the sun.
But as transportation methods improved and travel times decreased,
these inconsistencies created headaches for companies and passengers
alike. How could a train leave Philadelphia at 10:25 am local time,
travel for two hours, and arrive in Pittsburgh at 11:15 am local time?
And was that train leaving at 10:25 Philadelphia time, or 10:25
Pittsburgh time? Safety was also a concern, as trains attempting to run
on the same tracks at the same time could crash. To put it simply: Companies needed a way to literally make the trains
run on time. The Great Western Railway in Great Britain came up with a
solution first, implementing a standard “railway time” in its stations
in 1840. By adopting one single time, the Great Western Railway could
ensure its trains operated on the same time table. Conductors could also
more easily coordinate which trains were running on which tracks at a
given time, lowering the chances of a crash.
Time Zones Come to the US
Following from this early success, US companies began adopting their
own railway times in the 1880s. They established four standard time
zones for the continental United States in 1883.
However, many towns refused the changes, not wanting to sacrifice
their independence for a corporate-mandated standard. Localities
continued to keep their own time in addition to “railway time,” creating
a dual time system that (if anything) made the issue worse.
The Standard Time Act of 1918
The federal Standard Time Act in 1918 put an end to these
discrepancies. The act allowed the (now-defunct) Interstate Commerce
Commission to create time zones. Though the boundaries have shifted over
the decades, the four original continental US zones (Eastern, Central,
Mountain and Pacific) remain. The legislation also temporarily
established Daylight Savings Time in most of the United States, another
temporal oddity.
The map above from 1913 shows the early versions of the four US time
zones. Note how Michigan, Ohio, Indiana and many of the southern states
have since transferred from Central Time to Eastern Time, presumably to
be on the same time as heavily populated East Coast cities like New York
and Washington, DC.
By Sunny Jane Morton
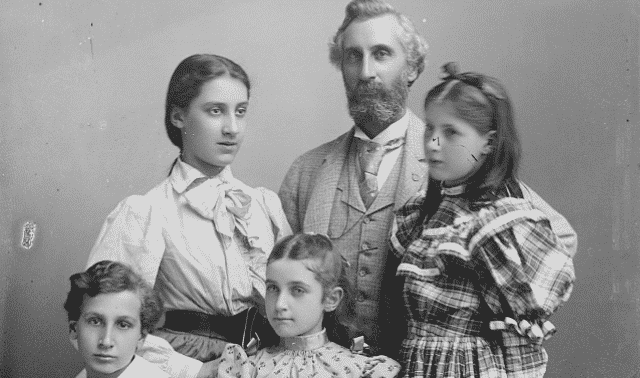
Riley family. C.M. Bell, photographer. Washington, D.C. [between February 1894 and February 1901]. Retrieved from the Library of Congress.
In the past, women appeared in records with far less frequency than
men, especially under their own names (rather than their husbands’). If
you don’t already know who they married, it’s easy to lose track of
women before or after their surnames changed. For these reasons, it
often takes extra effort to identify and trace women throughout their
entire lives. Try these 5 tasks to get to know the females on your
family tree.
1. Interview a female relative
Request some time from an older woman in your family (mother,
grandmother, aunt or sister) to sit down and chat about their lives,
experiences and memories. If you can do this in-person, you’ll likely
have a more meaningful experience. But if you need to talk via Skype or
Google Hangouts, you can use software such as SnagIt to audio- or video-record the conversation.
Before the interview, share with your subject the topics you hope to
discuss, and give her veto power over any she doesn’t want to talk
about. Ask her if there’s anything (or anyone) she’d especially like to
tell you about. Get permission to record the conversation for family
history purposes. Express your willingness to turn off the recorder if
there’s something she wants to say off-the-record (and then stick to
your commitment).
A lot of things have changed in women’s lives in recent decades.
Don’t forget to ask your female relative about the changes that have
affected her the most—and what she thinks of them. You might also ask
what she thinks has not changed, for the better or the worst. Listen
carefully to her perspective and don’t judge her or try to get her to
change her way of thinking. This is a time to appreciate her for who she
is. Thank her sincerely for sharing her thoughts and feelings, whether
you agree with them or not. Here are some additional tips on interviewing a relative.
Senior family members are often the best genealogy resource.
Here are family history interview questions to ask to discover more
about generations past.
2. Find your female ancestors in all available records
Especially as you go back further in time, information about the
women in your family may be buried in records about the men. Dig into
documents about the husband, siblings (especially brothers), parents and
children. Look for her unknown surnames in relatives’ obituaries, her
marriage record(s) and her children’s birth records (find more strategies here for learning a woman’s maiden name).
In older times, you may have to look even harder for women. Especially in the South, you may find brides mentioned in marriage bonds or the dower release portion of a land record. See if she appears as a widow in her husband’s military pension records.
I once confirmed the identity of a woman by finding her mentioned in
her brother’s delayed birth record, shown below (read about that here.)
Delayed birth record
3. Tease apart multiple marriages and identify step relationships
Try to be accurate and precise about the marriages and family groups
on your tree. Wherever possible, follow clues indicating that a parent
is actually a step-parent; that a mother has more children you’ve
already accounted for; or that someone was previously or subsequently
married to someone else. Try to learn what you can about earlier or
later marriages, including whether they ended by the partner’s death, divorce or bigamy.
Remember that when you attach records to individuals in your online
trees, the sites may automatically attach children to step-parents who
may appear as parents in census records. Untangle any mistakes that have
been made by removing or clarifying relationships on your trees.
4. Follow all the daughters into adulthood
Your great-aunts and cousins deserve more than to be left dangling on
a family tree with no further information than what you attach to their
childhood census records. While you may understandably not want to put
the same kind of effort into fully reconstructing the lives of
collateral kin, try to at least account for them later in life.
Don’t leave your great-aunts and cousins hanging!
Did they marry? Move away or stay local? How and when did they die?
Note what you’ve learned on their tree profiles. What you learn may
affect your understanding of the ancestors you care most about. Learning
that your great-grandma’s little sister became a Catholic nun or that
her older sister helped raise her after their mama died certainly tells
you more about that great-grandma, as well. You may come to recognize
patterns, too:
“Researching family and friends
can reveal patterns that you won’t notice if you keep a narrow focus
only on your direct ancestors. Naming patterns or physical traits might
emerge, such as several members of the family being left-handed or
sharing an eye color. Other patterns might include occupations, military
service, religion, or even reveal social status, class or education
level.”
If you’ve taken an autosomal DNA test, sort your matches to learn
more about mom’s side of the family. In AncestryDNA’s updated Matching
experience, you can now see whether someone matches you on your mother’s
or father’s side (assuming it has been identified):
Researching maternal DNA
You can also take an mtDNA test to learn more about your direct
maternal line. “Because we all have our mother’s mtDNA, anyone can take
an mtDNA test to learn about maternal-line origins—and sometimes about
family history,” writes Diahan Southard in this article.
“Your origins information is provided in the form of an mtDNA
haplogroup assignment. This is just a set of letters and numbers, such
as H1a1a2b, that describes where your ancestor may have been thousands
of years ago. You also get a list of people who have the same mtDNA
profile as you do. Unlike autosomal DNA matches, your mtDNA matches
don’t necessarily share a recent ancestor with you. Because mtDNA rarely
mutates, there’s no good way to tell if a match is your second cousin
or your 22nd cousin.”
If you test early enough in March, you may have your results back by Mother’s Day. (Family Tree DNA, the only major vendor of mtDNA testing for genealogy, requires 6-8 weeks to process your test.)
Have you ever wondered what the difference is between C-Rations
and K-Rations? During WWII, US military officials had to find a way to
feed the troops when they weren’t near a mess hall. Rations were
prepackaged meals, easy to prepare, and intended to be eaten in the
field. The Unit History of the 63rd Infantry Division breaks down some of the different types of rations that fueled troops and helped Allies win the war.
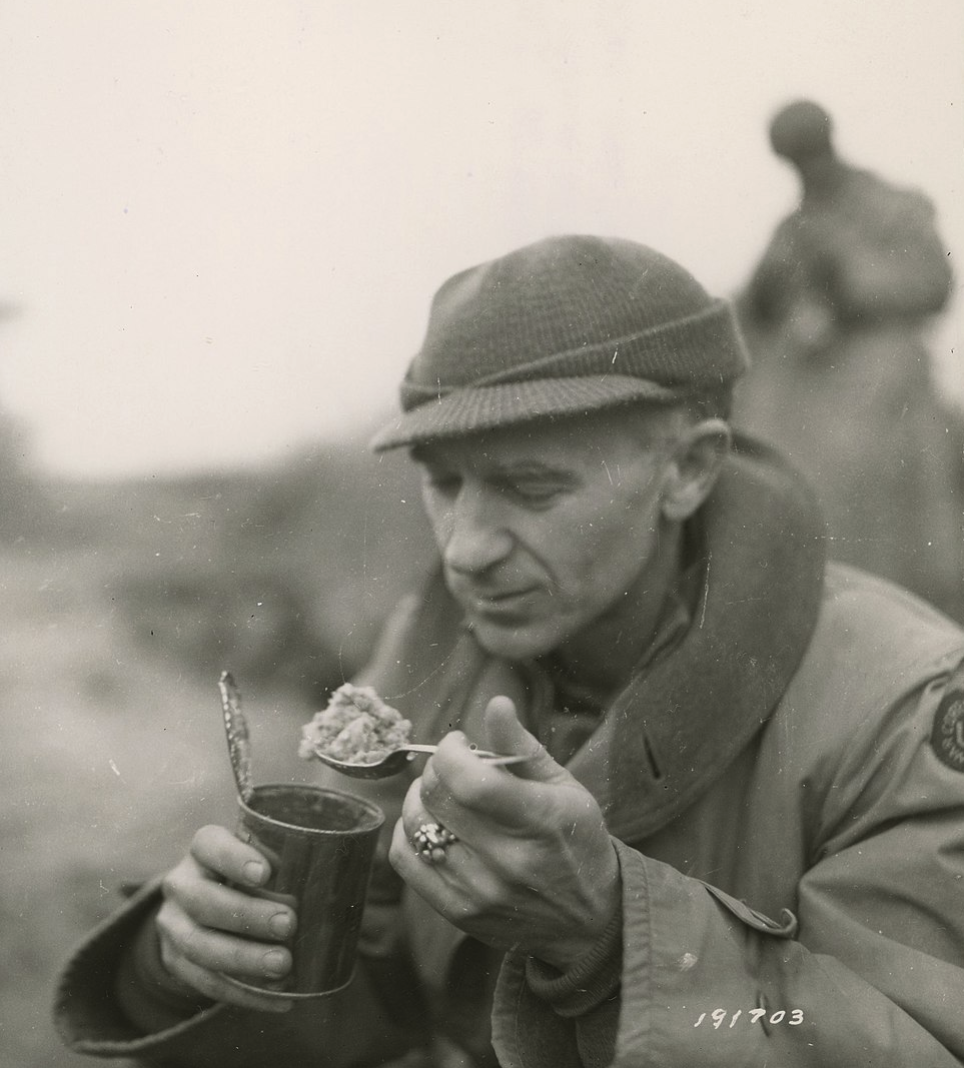
American journalist Ernie Pyle eating C-Rations
A-Ration: A-rations were the most preferred by US
fighting forces and consisted of fresh, refrigerated, or frozen foods.
The meals were prepared in kitchens or field kitchens and generally served in permanent dining halls.
B-Ration: B-Rations were prepared by trained cooks in a field kitchen
while on the move. Ingredients consisted of canned and dehydrated foods
that did not require refrigeration. Thus, the food could be kept in a truck or wagon for months without spoiling.
C-Ration: Often called C-Rats, these rations were designed for individual combat troops and consisted of precooked food in tinplate cans
that opened with a key. Initially, officials calculated that C-Rations
would only be consumed for no more than three days at a time and
produced just three varieties. As fighting forces relied more on
C-Rations, they quickly tired from the lack of variety, and the military
eventually expanded the offerings. C-Rations could be eaten cold but
tasted better heated and included an entrée, such as pork and beans, or
spaghetti and meat sauce. They also contained biscuits or crackers, gum
or candy, and cigarettes.
Soldiers load trucks with rations1944
D-Ration: The D-Ration was a heat-resistant, fortified chocolate bar intended to provide high energy in a small package
that soldiers could carry in a pocket. Formulated with help from
Hershey Food Corporation, the 1,800 calorie D-Ration contained
concentrated chocolate, vitamins, and other ingredients meant to sustain
a soldier during an emergency. It did not taste appealing, preventing
soldiers from nibbling on the bar unless necessary.
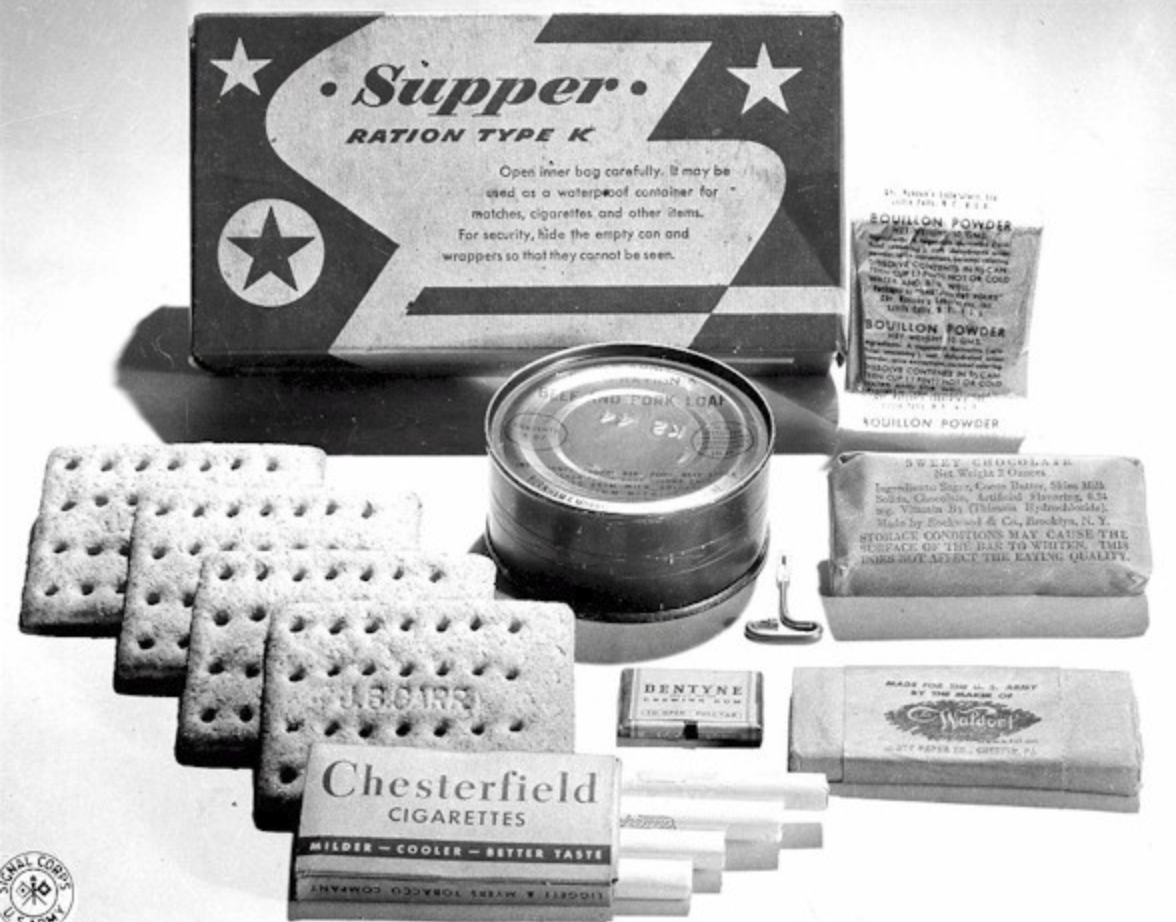
K-Rations
K-Ration: Originally developed for paratroopers by a University of Minnesota physiologist Ancel Keys, the K-Ration had lightweight but durable packaging. Three K-Ration meals
provided 2,830 calories but proved inadequate for some soldiers who
required more calories per day based upon their strenuous output. A
sample supper ration included a meat product, biscuits, a chocolate bar
or caramels, bouillon, coffee, sugar, wooden spoon, cigarettes, chewing
gum, and a packet of toilet paper.
In addition to the rations above, the military had additional field
rations and modified existing rations throughout the war. What stories
have you heard about WWII military rations? Search Fold3® to learn more about military rations and see our complete WWII records collection.
In 1926, roughly half the US population belonged to one of about
230,000 religious congregations across the country. Some churchgoers
also attended Sunday schools, church socials, service auxiliaries and
revivals; and sent their children to church-sponsored schools.
Such vigorous worship communities often produced vigorous records.
Among them were membership lists, baptismal registers, marriage records
and lists of deaths and burials. Maiden names, ages or dates of birth,
relatives’ names and relationships, and prior or subsequent residences
(including overseas birthplaces) may be sprinkled throughout these
records.
Church records aren’t always easy to find or access, but online
resources make this task easier. Online sources may help you identify an
ancestor’s probable congregation. Web searches may lead you to sources
of published or microfilmed versions and even digitized online records.
This guide will get you started.
Types of church records
Before you set off in search of church records, consider when it’s
worth searching for them. Records pre-dating the Civil War are more
likely to be written freeform in blank books or on loose sheets, often
with scant detail. Baptisms and marriages are the life events most
commonly found, with the date of the event, witnesses or godparents,
officiant, and (for children’s baptisms) names of parents. Deaths and/or
burials were more likely recorded if the church had its own burial
ground. Protestant faiths often created periodic roll calls of members
or a master membership list with infrequent but valuable details like a
spouse’s name or death date noted.
In the later 1800s, churches began using registers pre-printed with
columns. Details varied by faith, congregation and even the scribe. Many
Protestant faiths kept membership ledger books with separate lists of
ministers and church officers, baptisms (with parents’ names for
children), marriages (often with the couple’s residences) and deaths
(sometimes with burial information). The dates of these events,
officiants and sometimes witnesses were recorded.
Members of many Protestant denominations who migrated received
letters of transfer admitting them to the new church. Membership ledgers
may have notations such as “admitted by letter,” along with the
previous city or church. When someone moved out, you may see “dismissed
to” or “disposed of” with the destination and/or date. Rarely, letters
of transfer survive in church administrative files.
Some Protestant faiths, such as Lutherans and Methodists, recorded
more details than others. Baptist records are typically sparse. Record
content also may vary based on beliefs or practices. For example,
Quakers don’t baptize; therefore, they don’t have baptismal records. But
records of Quaker marriages often include the names of everyone in
attendance, the bride’s and groom’s residences and their parents’ names
and residences (or an indication the parents were deceased).
Catholic parishes (the term for a local congregation) didn’t
generally keep membership lists, but they did register sacraments—often
in Latin and sometimes, for churches with large immigrant memberships,
in a foreign language. Most often you’ll find records for:
Baptism, often performed within a day or two of birth, with the
date, godparents, child’s parents and the parents’ birthplace. Later
sacraments in that child’s life also might be noted here, too, even if
they occurred in another church.
Confirmation, often received
as a young teen, recorded as a simple list of those who received it and
the date. Use this record to confirm a family’s residence at that time
and participation in church life. More recent records may mention the
place and date of baptism
Example: Catholic Baptismal Register
Citation
for this record: St. Joseph’s Church (Fremont, OH). “Diocese of Toledo,
Ohio, Catholic Parish Records, 1796-2004.” Digital images,
Ancestry.com: accessed 19 April 2016. Original images from
FamilySearch.org.
The columns shown are for last name, date of event, particulars of baptism and additional comments.
These records are in Latin; even Latin forms of names may be used. “Guilel” is an abbreviation of Gulielmus, Latin for William.
The
translated baptismal record reads, “I, the undersigned, baptized
Appoloniam Helaram, born 15 Ap[ril], of Jos[eph] Steinlein from place
[blank] and Cath[erine] Gunther from place [blank], married. Godparents
were Jos[eph] Steiner and Appolonia Gunther.”
Comments include a
note about Appolonia’s marriage, specifying her spouse’s name, the date
and parish. Check that parish for records of the marriage and
children’s baptisms.
Marriage and possible banns (formal announcements), if they were read
prior to the marriage. Look for the couple’s name, parents’ names,
witnesses and officiant’s name. More recent records may indicate
baptismal place and date.
Extreme unction or last rites, performed for the dying. Look for
notes about the dates of death and burial, burial place, and sometimes
age at death.
Holy orders and taking of vows, for those who became priests or nuns.
(Look for additional records in an archive for the religious order the
person joined.)
Also look for denominational newspapers. Methodists published
regional versions of the Christian Advocate (for example, the New York
Christian Advocate or the Nashville Christian Advocate). Several
Catholic dioceses published newspapers or newsletters, too. Many of
these had limited runs in the late 1800s and included obituaries of
members.
Identifying the right church
On the eve of the Revolutionary War, more than half of those in the
English colonies were either Congregationalists (mostly in New England)
or Anglicans (Church of England, dominant in the South). Others were
Presbyterian, Dutch Reformed and in much smaller numbers, Quakers,
Baptists, Catholics, Methodists and Jews. Spanish and French colonists
were largely Catholic; a significant minority of French colonists were
Huguenots.
That religious picture changed dramatically during the following
century. Anglicans and Congregationalists lost government sponsorship
and popularity. More experiential faiths took their place. By 1860, half
the congregations in the US were Methodist and a quarter were Baptist.
Another 10 percent were Catholic—a number that would grow as more
Catholic immigrants arrived.
To determine what church might have records of your ancestors, make an informed guess based on these factors:
Family lore: Ask older relatives what churches
family members attended throughout their lives. Check with distant
cousins, too, especially those who still live near an ancestral
hometown.
Records: An ancestor’s faith or specific church
might be specified (or at least hinted at) in nonreligious records.
Watch for a religion or church mentioned in an obituary or associated
with a burial place (keeping in mind that a churchyard burial may have
represented the religious wishes of other relatives, not the deceased).
Research the affiliation of ministers who married or buried your
ancestors. Look up the meaning of symbols on tombstones. Look for
biographical details in funeral programs, county histories and other
documents.
Transitions: The religious choices of one generation
don’t always agree with the preceding one. Switching to a different
faith might happen with marriage or migration away from relatives or to a
place where the old faith didn’t have a foothold. As you trace
immigrant ancestors, be aware that some ethnic groups assimilated faster
than others. Watch for a transitional generation whose more “American”
naming patterns or dress are distinct from those of the previous
generation. This may be a key time to look for clues pointing to an “Old
World” religion.
Ethnic group: Immigrants often brought their
country’s dominant faiths. English were often Anglican (a denomination
that became the Episcopal church in the United States); Scots-Irish,
Presbyterian; and Scandinavians, Lutheran. Irish, Italians, Spanish,
French and many Eastern Europeans often were Catholic. Germans had the
most variety: Catholic, Lutheran, Reformed, Jewish and many smaller
sects.
Conversely, members of many religious groups—English Quakers or
French Huguenots, for example—came to the United States because they
didn’t agree with their national faith. Consult history books to learn
the overall religious picture of your ancestor’s ethnic or national
group, including dissenting or “nonconformist” sects that migrated
during that time period.
Immigrants from the same place and who shared a religion often
settled together in America. Those initial religious cultures evolved
with the changing times and residents. A region of the South that was
primarily Anglican during one generation may have become mostly
Methodist or Baptist within a few generations. Research local history to
learn about these patterns.
Proximity
The nearest reasonable option may have determined a family’s place of
worship. Many Congregationalists who went west from New England joined
Presbyterian churches, which had a similar culture. Migrating German
Lutherans may have joined ranks with local Reformed or similar German
sects. City directories and neighborhood maps showing property ownership
or local landmarks can help you identify the churches nearest your
ancestors.
Some Catholic immigrants didn’t attend the parish nearest their home.
In the late 1800s and early 1900s, ethnic parishes served German,
Irish, Italian, Slovak and other Catholics who wanted to worship in
their own languages. Local histories or a Catholic diocesan archivist
(see below) can tell you about local parishes that served your family’s
ethnicity.
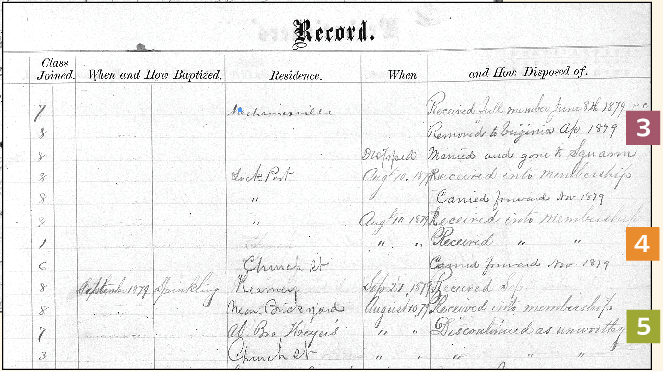
Example: Methodist Sunday School Register
Citation
for this record: Calvary United Methodist Church (Keyport, NJ). “New
Jersey, Calvary United Methodist Church Records, 1832-2003.” Digital
images, FamilySearch: accessed 19 April 2016.
On continuing pages, the year may appear in an abbreviated format, such as 81 for 1881.
Prob
likely stands for “probationer,” a probationary member. Look for these
names with further information on a probationer’s list in the register
book.
This migration information is a clue to look for individuals in their new places.
If someone was “received into membership,” look for his or her entries in the member list in elsewhere in the register book.
Notes
such as ”discontinued as unworthy” or “discontinued—drunkenness” reveal
more than just whether a person was present at Sunday school.
Accessing church records
Once you’ve identified a possible ancestral church, it’s time to
start looking for its membership or sacramental records. These may exist
in original manuscript, microfilmed, published and/or even digitized
format.
Although Ancestry.com and FamilySearch
have selected church records (including Quaker records on the former),
for the most part, these records aren’t online. But you can start your
search with your favorite web browser. Search for the name of the church
if you know it, along with the denomination, city and state. As
desired, add terms such as records, baptisms or marriages to narrow
search results.
Browse search results for websites of churches. Also watch for any
mention of records in online manuscript finding aids, genealogy website
databases, on microfilm or in published format at a library (more about
these below).
If the local church exists and has a website, your search should
bring it up. If you can’t find one, search for the name of the
denomination and the phrase “church locator.” Most denominations have
online tools to help you find their churches in specific locales.
Look for history information on the website to confirm that this
church existed during your ancestor’s life, was in the right place and,
if applicable, matched your family’s ethnicity. Most congregational
websites don’t mention whether they have old records, but it’s worth
browsing the site to see.
You should at least find contact information for the church office.
Send a brief inquiry about membership or sacramental records for the
time period in question and the procedure for ordering them. Ask whether
they would direct you to records if they exist elsewhere. Be polite and
patient. Church offices aren’t obligated to fulfill genealogical
requests. Mention your willingness to pay for a researcher’s time or to
make a donation to the church.
Your ancestor’s congregation may have dissolved or merged with
another one. In that case, conduct a web search for a denominational
archive. Consult the toolkit on the previous page for a starter list.
Some churches maintain a central archive or have archival collections at
universities. Other churches have regional archives, such as Methodist
conferences and Catholic dioceses. These may hold old records of
congregations within their boundaries. Contact archivists about how to
access historical records from the church and time period in question.
Tip: When requesting copies of records from churches
and religious archives, be respectful and patient. Church offices
aren’t obligated to help genealogical researchers.
If the denomination itself doesn’t seem to exist anymore, consult a denominational family tree like the ones at the Association of Religion Data Archives website.
You’ll learn important details. For example, Congregational churches
now exist under the banner of the United Church of Christ. This may help
you to locate existing successor churches or contact an appropriate
denominational archive.
The Family History Library (FHL) in Salt Lake City has many church
records on microfilm. On the FamilySearch website, click Search, then
Catalog. Search by place: Start typing the town, city, county or state,
then choose from the dropdown menu that appears. In your search results,
click Church Records. You’ll see a list of the FHL’s church records
holdings for that place; click each one for details on the type of
record and time period covered.
Some church records end up in private archives, too. Watch web search
results for online finding aids or record collection descriptions. Use Archive Grid,
an online catalog listing millions of records, to search for archives
near your ancestor’s home. Also conduct a targeted search for published
and/or microfilmed congregational records. Start with WorldCat,
an online catalog with over 2 billion items in libraries worldwide.
Enter the same types of search terms as previously described.
Besides membership and sacramental registers, archives’ collections
of church records may include church histories, denominational
newspapers, administrative minutes, changes in membership status and
occasionally members’ significant life events. Separate records may
cover women’s or other service auxiliaries. Financial records, including
itemized donation lists, also may mention your relatives.
If you find index-only versions of records, try to track down the
originals. They’ll expose any errors in the indexed information and
provide additional information that wasn’t in the index. Some Catholic
sacramental records are considered confidential. Church records are
released at the discretion of the record custodian, whether it’s a local
priest or diocesan archivist. If you can’t get photocopies of a record,
you might be able to at least receive a certificate with basic
sacramental information transcribed onto it. Request that every piece of
information on the record be provided, not just what the certificate
has space for.
Chronicling America
can help you identify denominational newspapers to research. Click on
the site’s US Newspaper Directory, 1690-Present to search for
denominational titles. The Language, Ethnicity Press and Labor Press
pulldown menus have options such as Anabaptist, Jewish and Catholic
Labor Unions. Also try keyword searches like Catholic diocese or
Lutheran. Click on a search result to look for microfilmed holdings you
might borrow through interlibrary loan, or print holdings at libraries
that may provide obituary searches.
Clues in church records
Church histories may have lists of members, substantial donors,
churchyard burials or clergy. See whether mention is made of original
church records still extant at that time. Scan the text to learn more
about the religious community to which your family belonged. Other local
or county histories may include historical sketches of the church, too.
Church records can solve several types of family history mysteries.
They can provide evidence of vital events when government records
conflict, weren’t created, or are missing. For some times and places,
church records may provide the most likely or even the only source to
mention births, marriages and deaths.
Tip: Don’t use a baptismal date as a surrogate for a birth date without evidence that it was an infant baptism.
They can resolve mysteries such as parents’ names, a woman’s maiden
or married surname, the “illegitimate” circumstances of a child’s birth,
an immigrant’s overseas birthplace, or a family’s previous or
subsequent residence. They even can help you reconstitute a family group
with all siblings, including those who died young and would otherwise
go unnoticed. They can tell you about women and minorities, who were
underrepresented in other records of the day. Finally, church records
may give you a better understanding of your ancestor’s religious life
and community.
When you come across records that require translation, try Google Translate for a single word or phrase. The FamilySearch wiki
includes several foreign-language lists of common genealogical words.
In the wiki search box, enter the name of the language and word list.
Published genealogical guides for various ethnic or language groups may
also include important genealogical words or phrases.
Fast Facts
Records begin: generally with establishment of an individual congregation
Jurisdiction where kept: individual churches’ administrative offices; denominational archives; government, university and private libraries and archives
Key details: dates and places of birth, baptism, marriage, death and burial; sometimes names of family members, migration places and dates
Search terms: name of denomination, church and/or congregation; plus the place and records, baptisms or marriages
How to find in the FamilySearch catalog: Under Search, select Catalog. Enter the place in the Places search box, then look under the Church Records category.
Associated/substitute records: records of birth, marriage, death and burial
A version of this article appeared in the September 2016 issue of Family Tree Magazine.
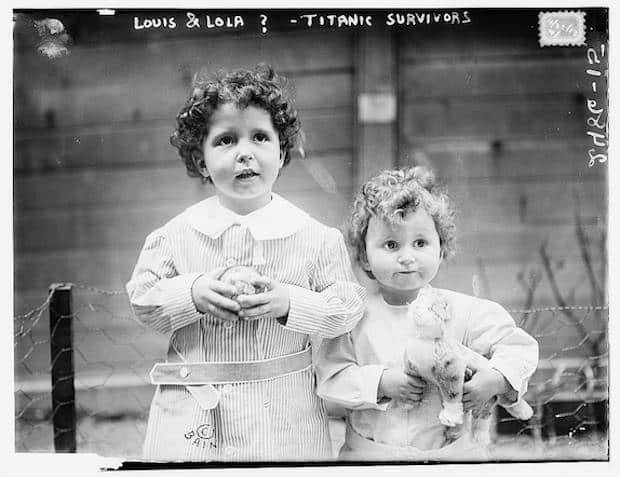
“Photo taken before the ‘orphans’ of the Titanic were fully
identified. The boys are French brothers Michel (age 4) and Edmond
Navratil (age 2).” Their nicknames were Lolo and Mamon. (Source: Library of Congress via Flickr)
Legal adoption by loving new parents wasn’t common until the past
century or so. Before that, orphaned American children may have been
taken in by relatives or neighbors, bound into servitude, sent to
orphanages or even shipped far away on a train. When children lost even
one parent, they were vulnerable to being placed in new homes. Their
fates depended largely on the time period and luck.
So how can you determine what may have happened to the families of
children who suddenly show up on (or disappear from) your family tree?
Here are five possible scenarios for what happened—and the paperwork
that may help you piece together the stories.
Taken In By Other Family
It’s a timeless practice for relatives, friends or neighbors to care
for orphaned children. But laws and attitudes about this practice—even
what it meant to be orphaned—have changed over time. From colonial times
to the mid-1800s, children were legally considered orphans if just
their father had died. So a child referred to in legal documents as an
orphan may have had a living mother. She, however, had few legal rights
over her children or their property.
When a family of means lost its father, courts typically appointed a
legal guardian to watch over the children’s inheritance until they came
of age. The guardian was usually the child’s closest male relative who
wouldn’t personally benefit if something happened to the child. Children
often remained under the daily care of their mother, if she was alive
and the estate provided sufficiently for the family. Look for records of guardianship appointments and related surety bonds in the county court that had jurisdiction, such as the county, orphan’s or probate court (the FamilySearch wiki article on that county may describe court jurisdictions). FamilySearch may have microfilmed records; search the catalog by place, adding the keyword guardian. Otherwise, contact the court directly.
If neither able-bodied mother nor family fortune existed, then
family, friends or neighbors often stepped in. This wouldn’t have
generated formal adoption paperwork. Evidence of their caregiving might
appear in a census listing showing the child living with a new family,
in correspondence, or in the child’s inclusion in the new parents’ wills
or estate paperwork.
Labor Contracts and Apprenticeships
When no relatives or friends stepped forward, communities took over
the care of orphans. This often was also the case for children whose
mothers couldn’t adequately support them and whose fathers were unknown
or absent. Taxpayers expected even young children who became public
charges to work to earn their keep. A common solution from colonial
times until after the Civil War was to “bind out” children into labor
contracts until they reached adulthood.
Indenturing and apprenticing children could be both voluntary and
involuntary. Two-parent families often willingly contracted their
child’s labor to a master for a proscribed time. In exchange, the child
received room, board and—for apprentices—vocational training. When the
contract was up, the master provided “freedom dues,” often in the form
of cash, clothing and tools.
Local officials could force children who became public charges, or
who were at risk of becoming so because of poverty or illegitimacy, into
indentures and apprenticeships. In the 1700s and early 1800s, elected
overseers or superintendents of the poor in townships, cities or
counties often made these decisions. They recorded their activities in
county commissioners’ records or in separate account or logbooks.
Surviving records may be in government offices or archives. Search for
microfilmed records in the FamilySearch catalog by place, then look for a
poorhouses, poor law or similar category. In Colonial Virginia,
Anglican vestrymen documented binding-outs in parish minutes; start your
search for surviving records at the Library of Virginia.
Binding-out and apprenticeship contracts were filed in local courts
that had jurisdiction over orphans and estates. Contracts might name the
indentured party, master and terms of the agreement. Later court
records may show the conclusion, extension or breaking of the contract.
Locate these records in the same way suggested for guardianships.
Apprenticeship and binding-out records aren’t often found online, but
Ancestry.com has a database of about 8,000 such names for Virginia.
African-American children were disproportionately impacted by the
binding-out system. Before the Civil War, some Southern states allowed
courts wide latitude to bind out free black children to white masters.
After the Civil War, Southern states enacted new laws that favored
indenturing children of color to white masters, with preference given to
their former slaveholders. Justifications for indentures included
parental neglect, poverty, unemployment or an act of bad behavior by at
least one parent.
Binding-out contracts should first appear in local court records,
along with follow-up efforts by parents to reclaim their children. After
emancipation, when courts turned a deaf ear, thousands of
African-American parents enlisted help from the Bureau of Refugees,
Freedmen and Abandoned Lands (“Freedmen’s Bureau”). Start with its field
office reports for information about labor contracts and disputes.
She appeared out of nowhere. In the 1860 US census, 12-year-old Mary
Lackey lives in the North Carolina household of Benjamin and Luranna
Gilbert. Like all censuses before 1880, the record doesn’t state any
relationship between household members. The 1850 census is no help,
either: That year, the Gilberts were a childless couple in their 30s.
Who, then, was Mary Lackey?
Court records have the answer. On the 14th of April, 1851, the Yancey
County, NC, Court of Common Pleas entered this order: “Ordered by Court
that … Mary Lacky aged about one years old … minor heir of Elizabeth
Lacky be bound unto Benjamin Gilbert until she attain to the age of 18
years … .”
So Mary Lackey was the Gilbert’s young servant. She was just one year old when she was contractually bound to them.
Mary
Lackey’s unexplained appearance with the Gilbert family in the 1860
census of Yancy County, NC, was a cue to look for information about her
birth. Records of the county Court of Pleas and Quarter Sessions (on FHL
microfilm No. 571520) in 1851 revealed that she was bound out to the
Gilberts. That record gives Mary’s age, “about four years,” and names
her mother, Elizabeth.
Orphanages and Children’s Homes
Almshouses existed in colonial America as early as the 1650s in New
York, 1662 in Boston and 1702 in Philadelphia. Poor farms and poorhouses
became more numerous by the early 1800s, particularly in cities. These
served primarily widows and children. During the following decades, most
counties established separate children’s homes. Charities also founded
institutions for special populations, such as foundling hospitals for
infants and unmarried mothers, and segregated homes for minority
children.
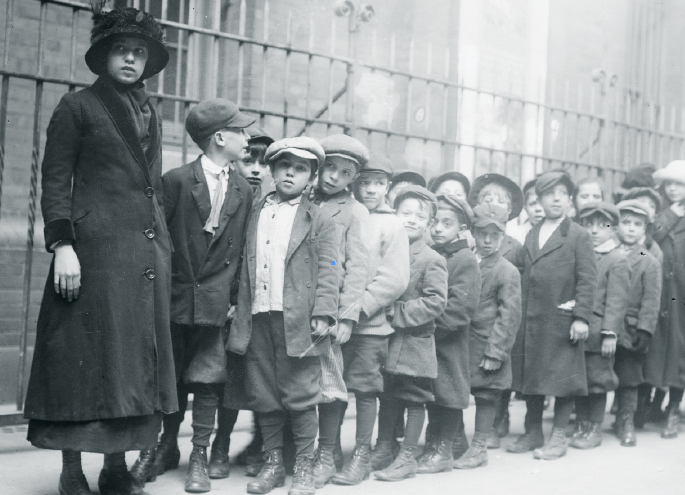
Many
children in orphanages, such as the New York City facility that cared
for these “inmates” in 1913, had one or both living parents. Families
might temporarily sign over children when unable to support them
financially.
The Civil War (and later, the Spanish-American War) caused thousands
more children to become orphaned or indigent. Several states, counties
and towns built homes especially for the children of sailors and
soldiers. The Grand Army of the Republic created similar facilities.
Placement in an orphanage was often temporary. Parents or extended
family might sign over custody of children until they could get back on
their feet. In fact, the majority of children eventually returned to
their homes. Children who were surrendered permanently became wards of
the state.
If you think a child may have been placed in an orphanage, look for
him first in the US census. As early as 1850, he should appear as an
“inmate” of a home, listed alongside other residents. When you find
children in an institution in the 1880 census, also look for their
enumeration in the Defective, Dependent and Delinquent special census
schedule, available for several states on Ancestry.com.
Censuses of homeless and institutionalized children may include
information about their parents, such as country or state of birth. If
you can determine what facility housed a child, try to locate records.
Search online for the facility’s name and location and look for:
Record indexes on websites such as Ancestry.com or USGenWeb articles about the history of the institution, which may point to surviving records.
Manuscript finding aids for original record collections at archives.
The
FamilySearch catalog also includes hundreds of microfilmed orphanage
records. Find relevant ones by running a keyword search with the name of
the facility or the word orphanage and the location.
Any surviving orphanage records are probably rich in detail. Records
may include intake registers, surrenders of children (also called
quit-claims) and even death and burial records for those who passed away
in the home. Some individual files may be restricted, especially those
that contain medical data. But you may at least be able to confirm a
residence along with some family information.
Orphan Trains
Not everyone was a fan of the orphanage system. Some reformers
thought children should be placed with families, preferably in rural
areas, rather than spending their lives in regimented orphanages that
didn’t adequately prepare them for adulthood. The most famous (or
infamous) approach to this early version of foster care was the orphan train movement.
In the 1850s, an estimated 30,000 children in New York City were
homeless. The Children’s Aid Society in New York struggled to care for
them. Society leaders believed children faced brighter futures with
rural families. The society began shipping children by train to mostly
the Midwest and West. Willing families, responding to newspaper ads,
showed up at the railway station, chose a child and filled out contracts
to shelter and educate them. Older children would be paid for their
work. In theory, the society tracked the welfare of each child, but in
practice this proved impractical. Records created at the time and
afterward showed that many children did well and some didn’t.
Nearly every US state, as well as Canada and Mexico, received orphan
train children, with Indiana receiving the most. The New York Foundling
Hospital, New York Juvenile Asylum and Orphan Asylum Society of the City
of New York all placed children on orphan trains, as did institutions
in Chicago, Boston and Minnesota. All told, about a quarter million
American and Canadian children rode orphan trains in the last half of
the 1800s and through 1929.
Today, a network of orphan train riders and their families researches
their roots via the Orphan Train Heritage Society, housed at the
National Orphan Train Complexin Concordia, Kan. The official archive of the Children’s Aid Society is at the New York Historical Society Museum & Library.
The collection is rich in historical material and correspondence;
however, much material from individual case files is restricted.
Research services are available for those who can’t visit the library
themselves. Find contact information for several institutions that
participated in orphan trains here.
Start researching an orphan train relative with his or her appearance
in federal and state censuses. Look for him both in institutions before
placement and in homes afterward. Ancestry.com has a database of about 5,000 children who lived in Children’s Aid Society facilities during various state or federal censuses. Also
research local newspapers for ads or articles about the arrival of the
train. Several state-level orphan train groups and regional research
facilities gather information about riders in their areas.
Adoption
Formal legal adoption is a modern practice that didn’t begin in the
United States until Massachusetts passed a statute allowing for it in
1851. This law, quickly copied by other states, required the court to
supervise adoptions and gave adopted children the right to inherit from
the adoptive parents. By the end of the 19th century, laws generally
required that courts consider the good moral character of the adoptive
parents and their ability to support and educate the child. Informal
adoptions, though, continued well into the 20th century.
Adoption records were public everywhere until 1917, when Minnesota
passed the first law making them confidential. This protected the
records from public scrutiny but left them open to adopting parents and
adoptees themselves. By the mid-1940s, confidentiality gave way to
secrecy: Many young girls were sent to homes for unwed mothers where
they were pressured to surrender their babies for adoption. Records were
sealed, and a new amended birth certificate issued listing the adoptive
parents as the parents. Even the adoptee was unable to obtain a copy of
the original record.
The change from open court records to confidential records to secret
records makes adoption research a real challenge. Changes in access
laws, however, have opened some states’ adoption records to both
adoptees and members of birth families under certain circumstances.
Essentially, all states allow adopted persons access to nonidentifying
information once they reach adulthood. That may include the birth
parents’ ages and general physical information, race, ethnicity,
religion, medical history, education, occupations and existence of other
children.
Some states disclose identifying details about adoptees and birth
parents, often only with mutual consent. Roughly 20 states give some or
all adoptees access to their original birth certificates. In still other
states, adoptees and birth families must use confidential
intermediaries to obtain information. If you’re looking for your birth
family or that of a parent or grandparent, find summaries of states’ current access laws online.
Under the State Resources menu, choose State Statutes, scroll to
Adoption topics and choose the specific subtopics. See also the American Adoption Congress website.
DNA testing is a relatively new tool available for finding biological relatives. Start with autosomal DNA tests, available from AncestryDNA, MyHeritage DNA, 23andMe and Family Tree DNA
(look for the Family Finder test). Results can link adoptees to family
members who’ve also tested, and verify biological relationships hinted
at in paper trails. Tests work best when matching close relatives, and
are least reliable for fifth cousins and beyond. Understand that the
process is emotional for adoptees, their parents and birth families (who
may not be aware of the adoption). Approach matches—and your own
feelings—with a great deal of sensitivity.
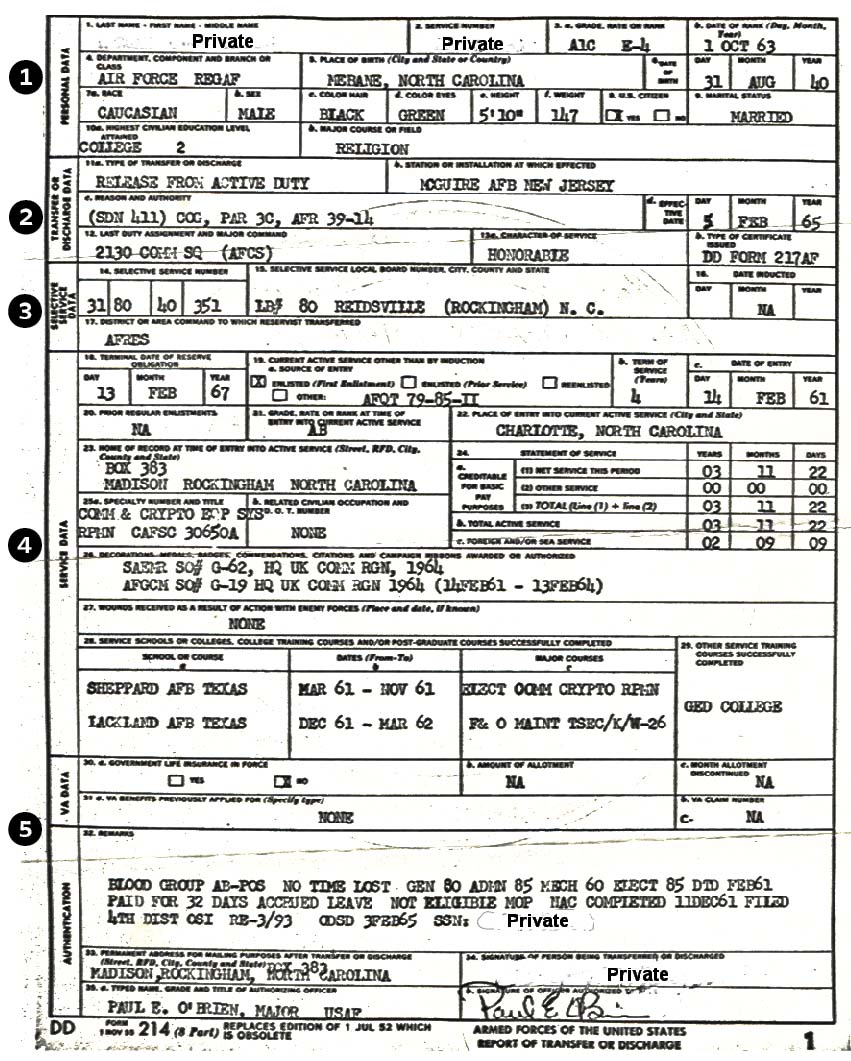
Beginning in 1950, the Department of Defense issued DD-214 forms,
also called Certificates of Release or Discharge from Active Duty. As
the document’s longer name implies, each service member received a
DD-214 upon his or her discharge from the United States Armed Forces.
The form includes a verified record of the service member’s active and
reserve duty, making it a valuable genealogical record. The Department
of Veterans Affairs and employers used the document as proof of military
service for veteran benefits and employment purposes, respectively.
The form replaced the WD AGO Forms and NAVPERS (Naval Personnel)
discharge documents. (Those who served in the Army National Guard or Air
National Guard received separate documentation.) A fire in 1973 at a National Archives center in St. Louis
destroyed most Army and Air Force personnel records from the mid-20th
century—making DD-214 forms critical in documenting military service.
Below is a DD-214 form from 1963, with annotations that will help you
understand information in each column. Note that the person’s name has
been redacted for privacy.
1. Personal Data
Details listed in DD-214 forms include the individual’s full name,
service number, rank at discharge, place and date of birth, race, gender
and marital status. The document also contains a physical description
of the person and some background information about his or her
education. Each piece of data can point you to additional records.
Genealogist’s Military Records Field Manual eBook
Trace
your military ancestors! This eBook contains great strategies for
finding your ancestors who served in the military, including how to
research Civil War ancestors, find military service records and
interpret draft registration cards.
Here, you’ll find information on why the government issued this form.
For example, the class of discharge or separation indicates the
circumstances surrounding the person’s discharge: Honorable, General,
Bad Conduct (i.e., court-martial) or Dishonorable (for an offense such
as rape or murder). Note that those Honorably Discharged or receiving a
General discharge typically transferred to that service branch’s
reserves. The DD Form 217AF indicates the person is being discharged from the Air Force.
3. Selective Service Data
Look for the individual’s Selective Service Number (which the
government used for draft purposes), along with where the individual
registered. No date of induction indicates voluntary enlistment.
4. Service Data
This expansive section includes the date and location for entry into
service, termination date for reserve duty and home address. You’ll also
find the individual’s operative specialty(ies), service statement dates
(including any foreign service time), and any decorations/awards or
wounds received. You’ll also see any schools, colleges or training.
5. VA Data and Authentication
Here, you’ll find any information concerning life insurance allotment, plus final details for the discharge or separation.
A version of this portion of the article appeared in the December 2019 issue of Family Tree Magazine.
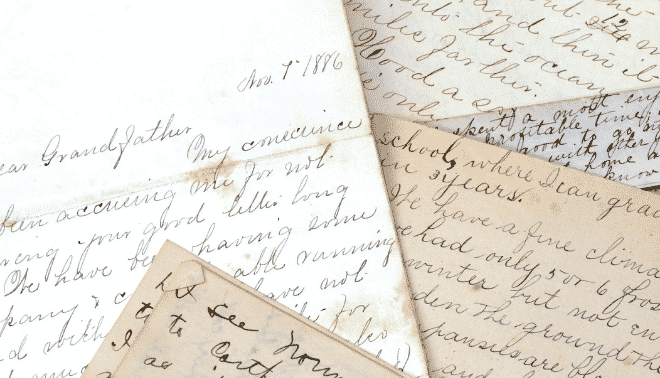
Genealogists treasure handwritten letters because they reflect
ancestors’ thoughts and experiences in their own words, on paper they
handled. Correspondence provides a rare personal connection with
ancestors. Whether you inherit Grandma’s missives or find your Civil War
soldier’s last letter home in a public archive, here’s how to preserve
these writings as part of your family history.
Q:
How can I preserve a bundle of my grandfather’s letters to home when he
was serving overseas during World War II? They’re in the original
envelopes, wrapped with broken rubber bands.
A: Your collection is doubly valuable as a resource
both for your family history and the country’s broader wartime history.
As you take measures to preserve the letters, study them for news of
friends and family that you can extract and confirm for your family
tree. You’ll also want to read the letters for insight into the
personality and everyday life of your grandfather and his buddies.
The durability of old documents depends on both the type of paper and
the storage conditions. Paper made before around 1865 consists of
cotton fibers, whereas most papers after that date are a combination of
wood pulp and lignin. Lignin is the substance that makes your newspaper turn yellow in sunlight. In the late 19th century, stationery used for letter writing could be either type of paper.
Once you’ve investigated what type of paper they are written on, here are a few steps you can take to preserve your old letters:
Work on a clean surface with freshly washed hands, and avoid handling the letters more than necessary.
Remove
and discard those failing rubber bands, which can leach chemicals that
can harm your letters, but make note of how the letters are grouped.
This may help you identify mysterious references to people and events a
relative mentions having previously written about. If the paper is
brittle and cracking, don’t force pages open. Instead, allow the loosely
folded pages to sit undisturbed for a few hours. Often, the paper will
absorb enough moisture from the air to relax and become easier to
handle.
Open the letters one at a time and remove any
foreign objects, especially staples, straight pins or paper clips; these
tend to rust and damage paper over time. Keep pages together in their
original order by placing each letter with its envelope in an individual
acid-free, lignin-free archival file folder. This type of storage
material is available from a variety of archival suppliers, such as Hollinger Metal Edge and Archival Methods.
Digitize the letters by scanning them on a flatbed scanner (scan the envelopes, too, if you have them) at a resolution of 300 dpi (dots per inch).
Avoid sheet-fed scanners, which are fine for modern papers but can
damage fragile heirloom documents. Use the digital versions for
transcribing the letters and making copies to share; preserve the
original letters in your home archive.
Store the folders
upright in a metal filing cabinet or acid-free archival document box
located in an area of your home with consistent temperature and relative
humidity. A closet on an inside wall is ideal.
More Letter Preservation Tips
A numbering system can help you keep track of which letters were
bundled together and in what order: You could label the outside of a
file folder Bundle A, Letter 2, George Longworth to Bessie (Meyers) Longworth, 6 March 1942. Then organize folders chronologically by date, author or addressee, depending on your purpose and the size of your collection.
If you didn’t inherit your great-grandfather’s wartime letters,
perhaps another descendant did. Family letters also may have ended up in
a historical archive or library where researchers can view them. Use
these tips to start your search for long-lost letters:
Identify ancestors who lived away from home
due to military service, migration or some other reason. With whom
might they have corresponded? Also note ancestors who were prominent
community members.
Query descendants of letter writers and potential recipients about any documents they’ve inherited.
Google the names
(be sure to try women’s maiden names) and hometowns of the above
ancestors to find blog posts, website mentions or items for sale on eBay.
Search catalogs and websites of archives and libraries
in ancestral hometowns. Next, search for names of family, friends and
neighbors who may have mentioned your family in their correspondence.
Search the National Union Catalog of Manuscript Collectionsthrough the Library of Congress portal. This catalog helps you find personal and family manuscript collections from throughout the United States.
Try to connect with others tracing your family.
Look at images they’ve added to their trees. If your own family tree
image gallery is bare, post a “teaser” image from your collection to
encourage others to get in touch with you.
Q. I am a total novice as far as family trees go, and I need to know exactly what a “collateral descendant” is.
A. A collateral
relative is any blood relative who is not your direct ancestor. So your
ancestors are your parents, grandparents, great-grandparents, etc., and
your collateral relatives are cousins, nieces, nephews, aunts, uncles,
siblings, etc.
Here are three common research scenarios we may face and ways our collateral research can help solve them:
1. Where did an immigrant ancestor come from?
Say you have a great-great grandmother and you don’t know where she
came from. No passenger lists or naturalization documents can be found.
Eventually, you find a baptismal record for one of her children in the
United States (not the record of the ancestor through whom you descend)
that mentions both parents’ birthplace—including the name of the tiny
town in Slovakia.
2. Who are a female ancestor’s parents?
A census record identifies an older man living with her to be her
father, which reveals her maiden name. No other documentation on him can
be found, but she is buried next to a man with her maiden surname. He
was of age to be her brother. Researching the life of the man buried
next to her reveals both of his parents’ name (in his SS-5 application).
His mother’s will names all her surviving children—including that
daughter.
3. What happened to my ancestor?
It’s not uncommon to have an older adult disappear from records
without finding a death record to explain the disappearance. Following
each child forward in the census and city directories eventually leads
to her name (mis-indexed) in the household of her youngest daughter’s
husband. They’re living across the state line from where you found her
gravestone. That’s why you hadn’t found her death record or an
obituary—she was living in an entirely different state than expected
when she passed away.


.png)