Search This Blog

Thursday, January 20, 2022

Family Reunions: 10 Steps to Plan (and Save Your Sanity)

 By Mary Snyder

Written by Mary Snyder, unless otherwise noted

Jump to:

1. Send out a questionnaire for planning input.
2. Recruit and delegate tasks.
3. Create a planning command center.
4. Build a budget.
5. Prepare a back-up plan.
6. Communicate with attendees.
7. Offer activities for everyone.
8. Start the reunion with an icebreaker activity.
9. Share your family’s story.
10. Maintain the reunion’s momentum.
Related Reads
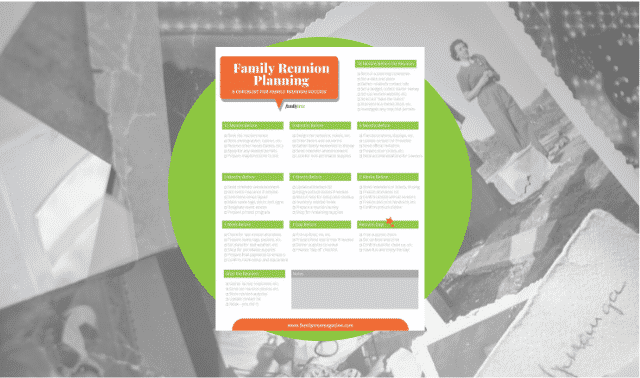

Planning a family reunion? Use this handy timeline and planning checklist to guide your decisions and strategies, for both before and after the event.

Whether you’re expecting a dozen cousins or several hundred relatives, planning a meaningful, memorable and fun family reunion is a challenge. It takes time, organizational skills and a sense of humor. These 10 steps will help make your reunion a success—and keep you sane.

1. Send out a questionnaire for planning input.

Start by picking a date and location. Professional planner Bill Gunkel of Reunions Unlimited recommends you begin planning at least 12 months ahead. Your best first step, he says, is sending questionnaires to family members to get input on when, where and what they want.

Gather a committee to select three possible dates and locations. Send questionnaires asking family members to rank the options. While you can’t meet everyone’s needs, a survey is the best tool for finding out what works for most relatives.

Are you in a reunion rut? If it’s at the same time in the same place every year, consider a change. Something as simple as a new menu (from a potluck, for example, to a catered meal) and different activities could bring the life back to the party. Whatever you decide, work within your budget and give relatives plenty of notice about the change.

Lisa A. Alzo

2. Recruit and delegate tasks.

No one person can manage all aspects of a family reunion. Surround yourself with capable and enthusiastic committee members. As the chairperson, you’ll oversee the event, handle communications between committees, coordinate the volunteers—and occasionally play peacemaker.

For small events with 20 or 30 people, you’ll need only a few volunteers. Large events require more volunteers and committees.

Enlist as many family members as possible, aiming for a representative from each family unit. Delegate tasks and follow up to make sure people do what they promise. Don’t worry if your committee members are scattered around the globe. You can conference call via Skype or start a Google Hangout. Skype text and voice chats with multiple people are free, but you’ll need a premium account to initiate a multiperson video chat. Google Hangouts are free for up to 10 people. You also can share files and spreadsheets on Google Drive or Dropbox.

This strategy has worked well for my family. Email and conference calls with members representing each family works best for deciding themes, or any new or different menu items, or games, This helps us divide up the tasks among several members.

Lisa A. Alzo

Reunion Jobs

  • Finance director: handles the reunion checking account, maintains the budget, makes purchases
  • Lodging liaison: finds accommodations and negotiates group discounts
  • Food director: works with the caterer or handles the potluck
  • Correspondence officer: communicates with family members
  • Entertainment director: organizes activities for a variety of ages
  • Reservations officer: tracks who’s coming
  • Mementos procurement: gathers family mementos for display
  • Welcome committee: makes name tags, agendas and signage; mans registration; helps people mingle
  • Keepsakes collector: makes or purchases keepsake favors ahead of time, and passes them out at the gathering

3. Create a planning command center.

A reunion generates paperwork: Even with subcommittees, the reunion chairperson needs copies of pertinent information, such as contracts with food vendors, updated registration information, and lodging details.

You might keep everything in a simple file folder, or you may want separate folders for each committee in a file box. Keep your records organized—you’ll refer to them often

4. Build a budget.

The reality is your reunion will cost money. And unless you’ve hit the Powerball jackpot or have a wealthy and generous relative, you’ll need a budget and you’ll have to ask your family to pitch in. “It’s not written in stone that it must cost a lot of money. But you will need money if you’re doing mailings; and for deposits if you’re planning a banquet or reserving a park pavilion,” family reunion expert Edith Wagner says in her free How to Ask for Money podcast. “If you’re like many reunion organizers, you will be fronting some, if not all, of the money to begin. Others need to know that you expect them to contribute to and/or pay their fair share.”

You could write a letter to each family describing the upcoming reunion and asking for a contribution. Let them know how the money will be used. For more-expensive get-togethers such as cruises, offer monthly payment options. Another idea is to ask individuals to donate a service such as printing as their contribution. At the reunion, you might auction donated items to raise money for next year’s event. Keeping costs low, perhaps by booking a park shelter or community center and holding potluck meals, will encourage attendance.

In a subsequent family reunion update, asking each family to pitch in a set amount of seed money is a good way to offset startup costs. Get more dough with fundraising projects, and include financial updates in mailings.

5. Prepare a back-up plan.

If your reunion will be outside, reserve a pavilion that can accommodate all the attendees in case of unexpected weather. Pack a few board games or crafts the children can do indoors.

6. Communicate with attendees.

Send invitations as early as possible. If you wish to mail them you might opt for a simple flyer, a card or postcard, or an elaborate family newsletter. An eco-friendly option is an invite delivered via email from Evite or Punchbowl.

Meanwhile, go online to relay information and incite interest. You can create a private event page on Facebook and invite people to join, or put someone in charge of sending simple email updates from time to time. Another idea is to use a family-centered website such as Geni as a message hub.

Include family trivia in your communications! Encourage relatives to send stories, ideas and updates for the mailings. This involvement often leads to better attendance.

Share the family reunion theme

Themes are an effective way to generate enthusiasm for your reunion and coordinate food, attire, decorations and activities. Our family did an All-American theme in 2003, with red, white and blue attire; picnic classics (hamburgers, hot dogs, potato salad); and musical chairs set to patriotic tunes. Other easy themes include back to school, Christmas in July, country and western, New Year’s Eve, pajama party and toga party. Decade-based themes—’50s, ’60s, ’70s, ’80s—also work well, as do those associated with an anniversary (the 25th annual reunion; your grandparents’ 50th wedding anniversary). Themes with a heritage flair, such as Hawaiian, Irish or Mexican, can help you incorporate your family’s heritage, as would a theme celebrating your Civil War ancestor or Grandpa’s WWII service.

Announce the theme well in advance so everyone can design their costumes and your committee can coordinate food, decorations and activities. Try to stick with themes that aren’t too elaborate so family members can use what they have around the house or buy cheaply at party stores or the local dollar store.

7. Offer activities for everyone.

Structured activities are great — even necessary — for getting relatives reacquainted when they’ve been out of touch for years. Roots reunion activities have another objective: to foster the exchange of family history information. Plan pastimes that appeal to a range of ages, and encourage different generations to interact. But don’t cram the schedule: Pick a few amusements, and leave downtime between them.

For each activity, find a way to record the memories that surface. Recruit responsible volunteers to take notes, hold a video camera or use a tape recorder. The end product will be a piece of family history, a source of research leads and perhaps a reunion souvenir. We recommend the following activities:

  • Show-and-tell session: Ask everyone to bring an heirloom, photo or other memorabilia and share a story about it.
  • Oral history interviews: They can be as simple as pairing up people with questionnaires, clipboards and pens. Or for a more “official” result, appoint a few relatives to conduct lengthier sessions.
  • Family recipe bake-off: Publish recipes and a bake-off announcement in your reunion newsletter. Let Grandma judge whose apple pie tastes most like her own.
  • Story time: Ask older relatives to tell family stories. Prepare prompts, such as “What about the time Grandpa had his tonsils out?” to encourage them if needed.
  • Family trivia: Gather entertaining facts about ancestors, and hold a Trivial Pursuit-or spelling bee-style quiz. Or you can turn the game into an icebreaker: Give each person a printed list of questions to answer (within a 5- or 10-minute period) by asking other relatives. Small framed photos make good prizes.
  • Field trip: Many cities have history-focused tour companies that can lead your expedition; these businesses may even arrange private outings for large groups. If your family’s more adventurous (or independent), print maps for self-guided tours. The d’Alvigny family, who descend from Confederate surgeon Noel d’Alvigny, toured the Civil War cyclorama painting in Atlanta’s Grant Park, as well as the cemetery where Dr. d’Alvigny is buried.
  • Genealogy workshop or round table: Hold a get-started class, ask family historians to bring their research and compare notes, or treat the group with a research trip to the library or courthouse.
  • Nostalgic games: Set up marbles, checkers, hopscotch, horseshoes, baseball or other games your ancestors played.
  • Candid camera: Place disposable cameras on tables throughout the room. Kids love them, and you’re guaranteed to have plenty of reunion photos.

Don’t depend on these activities to get answers to specific genealogical questions, though — in the hustle and bustle, relatives might get distracted and forget details. Instead, schedule off-site time to interview Great-aunt Ethel or convene with family historians.

Diane Haddad

For kids, aim for a mix of outdoor and indoor activities. Teenagers can organize the younger children’s games.

8. Start the reunion with an icebreaker activity.

Linda Johnson Hoffman, author of The Reunion Planner (Goodman Lauren Publishing), suggests icebreakers to kick off the reunion. “Getting everyone involved as they arrive is essential to setting the right tone,” she says.

Icebreaker Activities

  • Have a welcoming committee greet arriving guests.
  • Create a blank family tree and have each member fill in his information.
  • Provide an agenda of activities so no one gets left out.
  • Create welcome banners
  • Give away freebies, such as imprinted pens or notepads, at registration

9. Share your family’s story.

Once you’ve decided the planning particulars, you’re ready to move on to the genealogy particulars. That includes instilling enthusiasm among the invitees. Start a newsletter or Web site to report reunion updates and communicate your roots focus. Make it fun by publishing old “mystery” photos or family trivia. Promise to reveal the answers at the reunion, or offer prizes for the first correct answer. Consider including a family history questionnaire to collect stories. For help crafting one, visit .

Also ask family members to send copies of photos, letters and other memorabilia for a reunion display. “The Busse Family Reunion, cited in the Guinness Book of World Records as the country’s largest reunion, had a whole exhibition hall at the Lake County [Ill.] Fairgrounds to display family history and artifacts, including a collection of wedding dresses,” Wagner says. But there’s no need to rent a hall — even a dozen objects and photos arranged on a corner table will inspire memories and discussions about who has Great-grandpa Ed’s chin.

Use copies of original documents when possible, and keep your display in an out-of-the-way spot — otherwise you’ll be known as the mean relative who shot dirty looks at anyone approaching the photo table with a soda. Frame photos or put them in plastic page protectors with names and dates on label stickers. If you don’t know who’s pictured, write that on the label. Provide pens and paper in case a cousin can supply details. Other ideas for setting the roots mood:

  • Highlight an ancestor’s experience — such as immigrating to America or following the California Gold Rush — with a history display: Search the internet for photos and information, visit museums for brochures and create a fact sheet about your ancestor’s experience. 
  • Post a giant family tree chart: Print one from your genealogy software, or draw your pedigree on taped-together sheets of paper (or butcher paper). Melanie Fagan of Crestwood, Ill., color-codes her tree’s branches with name tags to show at a glance where everyone fits. “The tree is tacked to a long table or wall, with a pen for people to make additions,” Fagan says. “Even people who don’t have anything to add love to look at it.”
  • Serve heritage-based foods and family favorites for dinner: Work with the caterers to use some of your recipes, or you can hold a potluck and assign relatives to bring their famous dishes.

Diane Haddad

More family history ideas

You’ll certainly want to bring along a printed copy of the family tree to explain connections, but a mile-long chart might not be the best way to capture the attention of your attendees. You’ll likely generate more interest with displays of photos, albums and heirlooms. If fact, a photo guessing game makes a fun activity. At one of our family reunions with a Pajama Party theme, for example, we had a Name that Napper contest: We plastered a poster board with pictures of family members napping at reunions over the years, and attendees had to guess who was in each photograph. The person with the most answers received a prize, and the game became a conversation starter.

Another great project is to convert your old home movies and videotapes of past gatherings to DVD or digital files (you were planning to do that anyway, right?), or use an online service to play at the reunion. Pair up relatives for oral history interviews with questions you’ve provided. Have them record the interviews with a smartphone or tablet app such as Evernote. Or you could have them record their memories by phone and create a LifeOnRecord.

Lisa A. Alzo

10. Maintain the reunion’s memories and momentum.

After the reunion, plan to keep in touch until the next one. Family newsletters and websites are great for this. Recruit volunteers to send a newsletter, create and monitor a page on Geni or Facebook, or build a beautiful family history website!

Let attendees take home souvenirs that enhance family unity and share the memories you’ve gathered. Someone (perhaps a designated “keepsakes collector”) can make or purchase mementos ahead of time, and then pass them out at the gathering. Or everyone can contribute to a project during the reunion, and you can mail copies of the finished product afterward. To ease distribution, have anyone who wants a copy self-address an appropriate-sized envelope and put postage money inside. Use one of these suggestions:

  • Pedigree charts and family directories: They’re easy to put together, and you can spice them up with the report options in your genealogy software. Use the reunion newsletter to let relatives update contact information or opt out of being listed.
  • Family history book: Mary Briggs of Tigard, Ore., sent an information-gathering letter before her family rendezvous: “I explained that I was going to put together a genealogy book that would be available at the reunion. I also asked for copies of documents, newspaper clippings, stories or old pictures.” Briggs assembled these contributions with her research materials — a total of 500 pages — and had them copied and put in three-ring binders. She sold the books at cost, about $40.
  • Video- or audiotape of reunion footage: Aside from allowing your cousins to relive the reunion fun, this option lets everyone have a “real-time” record of the family history discoveries made during the reunion — it’s ideal for preserving and sharing interviews or storytelling sessions.
  • Reunion portrait: Don’t pass up the opportunity to shoot a group photo while you’re all in one place.
  • Family recipe book: Along with recipes (solicited in the newsletter), include photos of family bakers and stories about their goodies.
  • “Brag book”-sized photo album of family photos: Incorporate pics from those disposable cameras you placed around the room, as well as copies of ancestral photos shared during the festivities. You also might include a photo (or miniature copy) of the family tree chart you displayed.
  • Scrapbook: Have each family create a page using provided papers, pens and Polaroids (or employ that handy newsletter to ask people to bring photos). Later, scan or color-copy the pages and mail them out.

Diane Haddad

Use a family email newsletter to share reunion updates, family stories, photos and recipes year-round. Collaborate on family tree research, participate in a fantasy football league, set up an NCAA basketball bracket, or check out other interactive online games. To guide your planning for next year, distribute a survey at the end of the event on paper, or via email a few days after.

Lisa A. Alzo

Versions of this article appeared in the April 2001 (Snyder), June 2004 (Haddad), and September 2013 (Alzo) issues of Family Tree Magazine.

Tuesday, January 18, 2022

Gravestone Symbols and Their Hidden Meanings

By Courtney Henderson
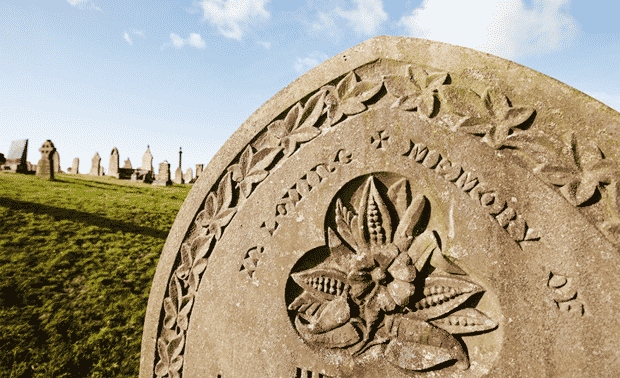
Flower symbols engraved in a gravestone.
A gravestone decorated with carvings of flowers and plants. (Getty Images)

A walk through a cemetery when researching ancestors can be a haunting, yet beautiful and reflective experience. Aside from names, birthdates, and death dates, gravestones are often decorated with symbols and icons.

These majestic, weather-worn stone carvings were popularized by those cipher-loving Victorians (from 1839 to 1920) and are more than pure decoration. They mean something; a virtue the person exemplified, a value they held dear, or a nod to how they earned their living.

In the table below, learn the meanings behind some common (and several uncommon) gravestone symbols. A revelation about your ancestor’s life may just be right in front of you, hidden in plain sight.

A word of caution before we get started, though: tombstone scholars still debate the meanings of certain symbols, so you could find varying interpretations. Don’t forget to grab your free download to common tombstone symbols before you head out on your next research trip!

Gravestone Symbols and Their Meanings

SymbolMeaning
Arches and gatespassage into the next life
Acornprosperity; power; triumph; strength; independence
Anchorhope; Navy
AngelsGod’s messengers and guardians; dropping flowers may signify grief, mourning; pointing to heaven may signify rejoicing
Anvil and/or hammerblacksmith
Basketfertility; maternal bond
Bat wingsdeath; misfortune
Beehivepossible membership with the Independent Order of Odd Fellows, or the Church of Jesus Christ of Latter-day Saints
Benchesmourning; contemplation
Birdflight of the soul
Bookoften the Bible, book of life
Bonedeath
Candlelife
Churchministry; possible pastor or minster
Clockmarch of time, usually stopped at hour of death
Clover (three- or four-leafed)Christian trinity; possible Irish ancestry or affiliation with 4H Club
Column and/or pillar (Broken)life cut short; sudden death
Column and/or pillar (Unbroken)a complete and full life
Cornfarming (also frequently symbolized by wheat)
Dovespeace; the Holy Spirit
Elkpossible membership with the Benevolent and Protective Order of Elks
Evergreenfaithfulness; remembrance
Feathered headdresspossible membership with the Improved Order of Red Men or Degree of Pocahontas
Fernsincerity; humility; solitude
Forefinger pointing downGod reaching down for the soul
Forefinger pointing upsoul’s passage to Heaven
Fruiteternal plenty
Half-carved tombstonetransition from life to death
Handshakewelcoming of a soul into Heaven; bond between spouses (if hands are feminine and masculine)
Harpworship; music to God
Hearta blissful soul (Colonial era); romantic love (Victorian era to today)
Horsescourage or generosity; possible membership with the International Brotherhood of Teamsters (especially if two-headed)
Hourglass or clockthe passage of time
Keyknowledge; entrance to heaven
Lambspurity, gentleness, innocence (popular on children’s graves)
Lampknowledge; spiritual immortality
Lilyinnocence and purity; resurrection; marriage and fidelity (Calla); innocence and humility (Lily of the Valley)
Marineranchor; sextant
Mortar and pestlemedical profession (pharmacist or doctor)
Oak leafstrength; stability; endurance
Olive treepeace; reconciliation between God and man
Palmlife conquering death; resurrection
Phoenixresurrection
Pineappleprosperity; hospitality; perfection
Roselove; beauty; virtue; motherhood; strong bond (intertwined); youthful death (rosebud)
Scalesjustice; law
Shieldprotection, faith, defense of the spirit
Shoes(empty, one overturned) loss of a child
Skulldeath; mortal remains
Soul effigyimmortality of the soul; passage to the afterlife (especially if winged)
Sphinxcourage; honor; power
Thistlesorrow and remembrance; potential Scottish ancestry
Tree-shaped or tree stumplife cut short; sudden death; possible membership with the Modern Woodmen of America or Woodmen of the World
Urndeath of the flesh
Wheatfarming; harvest; prosperity; full life
Winged death’s headmortal remains of the deceased
Willowmourning and earthly sorrow

Headstone Initials and Acronyms

InitialsMeaning/Affiliation
AAONMSAncient Arabic Order or Nobles and the Mystic Shrine (Masonic)
AASRAncient and Accepted Scottish Rite (Masonic)
BPOEBenevolent and Protective Order of Elks
FOEFraternal Order of Eagles
IHC/HISChristian; the first three letters of Jesus’ name in Greek
IOOFIndependent Order of Odd Fellows
K of CKnights of Columbus (Catholic)

Changing Meanings

If you have pictures of tombstones from different parts of the country, you’ll notice regional symbols that evolved as attitudes toward death changed. For instance, the winged death head (a skull with wings), most commonly seen on the graves of New England colonists, is one of the earliest cemetery art forms in America. The Puritans viewed death in its stark reality: It was part of their daily lives, and they believed their salvation was never certain. They had little regard for physical remains, and hastily buried loved ones with minimal ceremony. Although the Puritans grieved privately, they deemed public expressions of sadness inappropriate.

Harriette Merrifield Forbes, author of Gravestones of Early New England, and the Men Who Made Them, 1653-1800, has grouped Colonial and early American symbols from New England into five categories, according to their significance:

• recognition of the flight of time

• the certainty of death and warnings to the living

• the occupation of the deceased or his station in life

• the Christian life

• the resurrection of the body and the activities of the redeemed soul

Beginning in the early 1800s, Americans replaced the winged death head with symbols of mourning, hope and resurrection, as represented by the winged cherub, soul effigy, willows and urns. This transition no doubt stemmed from the Great Awakening revivals of the 1730s and 1740s. The old Calvinistic beliefs of predestination and damnation died, and notions of salvation through good deeds and divine grace took their place. Also during this period, people viewed the deceased as resting in a state of eternal sleep, so they adorned their loved ones’ graves with carved drapery, pillows, chairs, beds, flowers and other objects that would comfort them.

Headstone Materials

By determining the headstone’s composition, you can tell if the marker at your ancestor’s grave is the original or a replacement. Before the 1650s, people used mostly fieldstones or rough-cut rocks to mark graves. A stone from this time might have the deceased’s initials and death year carved on it. From about the 1660s to 1850s, headstones consisted of sedimentary rock, such as red or brown sandstone or limestone, and dark slate. You’ll also see early 1800s gravestones made from a grayish-blue slate. Marble was the stone of choice between the 1830s and 1880s. Since the 1880s, we’ve stuck with granite headstones. That means a granite stone with a pre-1880 death date isn’t the original marker.

A Note on Grave Epitaphs

Epitaphs are short verses or poems written to honor a deceased person, and they are frequently seen on gravestones.

Epitaphs typically reflect living relatives’ feelings toward the deceased, as survivors would select verses from monument makers’ and funeral directors’ catalogs. Occasionally, people would specify what they wanted on their tombstones — such pre-selected epitaphs tend to reflect the decedents’ personalities.

Like funerary art, epitaphs carved on gravestones reveal changing outlooks on death. Colonial verses were meant to provide instruction, not comfort. Here’s a common warning to the living:

Stranger, stop and cast an eye,

As you are now, so once was I,

As I am now, so you shall be,

Prepare for death and follow me.

Generally, families have derived epitaphs from popular or favorite poems, other classic literary works such as Shakespeare’s, and holy scriptures or prayers. As Americans came to favor more-comforting verses, scripture passages and prayers for mercy became the most common types of epitaphs.

Friday, January 14, 2022

The Gabs: What is the Importance of Giving Back?

This week, The Gabs asked, “What is the importance of giving back?” 

 Footnote: This was during a Marine Reserves "Toys for Tots" fundraiser, where over $32,000 was raised in toys and donations. A Great Event and Fun Time!

Santa
Santa Claus. Image by Gabby Reeder.

Santa Claus, North Pole: “Well, when you’re younger Christmas is all about getting things. When you’re older it’s about giving.”


Man with arms folded
Quentin Leer. Image by Gabby Reeder.

Quentin Leer, St. Petersburg: “Keep you connected with the community, man. It makes you feel good.”


Woman in a lobster graphic shirt
Mary Pendergrast. Image by Gabby Reeder.

Mary Pendergrast, Madeira Beach: “I think it’s important to give back to the community because there are a lot of people out there that need help. And if we don’t help them, they’re not going to get to enjoy life like everybody else. We always like to give back. I just do it because I feel like it’s our responsibility.”


Man in chair
Bob Bolles. Image by Gabby Reeder.

Bob Bolles, Seminole: “Oh, you always have to pay it forward. I mean, I’ve been very fortunate in my situation where people helped me, and you have to keep on giving it forward and help other people. Especially right now, things are a little tough for a lot of families.”

Thursday, January 13, 2022

Military Rank and Insignia: How To Decode Your Ancestor’s

By Family Tree Editors

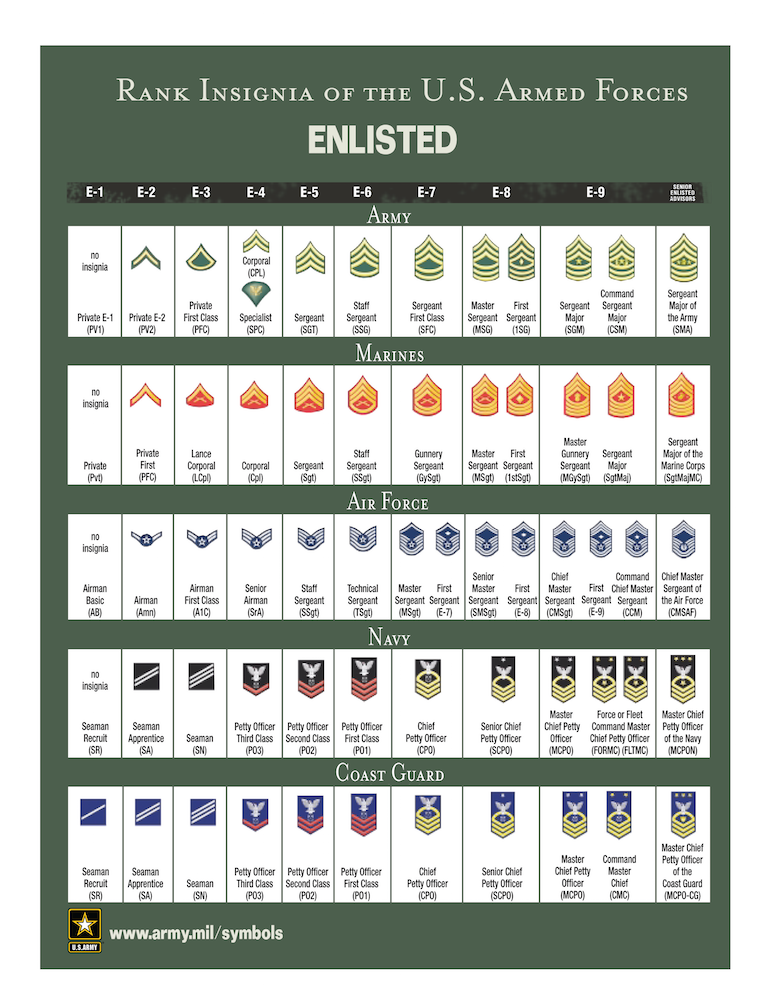
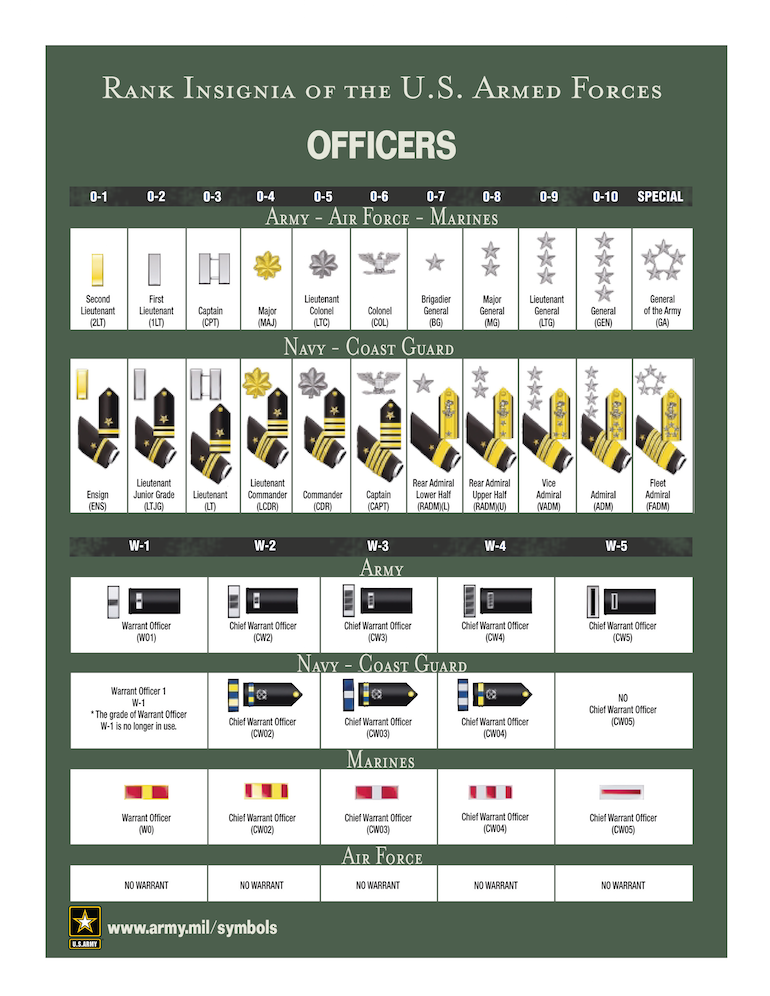
Military records can be a rich resource when researching your family history. However, many of us don’t fully understand the different symbols for ranks or record acronyms, particularly across the various branches. Here, we’ve included two charts highlighting military insignia: one for enlisted soldiers, and the other for officers—along with some guidelines to understanding how ranking works.

First, with the help of two charts from the official website of the US Army, we’ll explain the various ranks. Be sure to take some time to review the insignia of each branch’s ranks as well.

Understanding Military Insignia Charts

There are a few key items to note when reviewing these handy rank and insignia charts.

You probably noticed the different headers, such as E-1, W-1 and O-1. These are actually the labels for the pay grades, which are primarily used to standardize compensation in the services.

  • “E” stands for “enlisted”
  • “W” stands for “warrant officer”
  • “O” stands for “commissioned officer”
  • The number following the assigned letter indicates the pay grade
Rank Insignia of the U.S. Armed Forces: Enlisted

Pay Grades and Rank

A change in rank doesn’t always indicate a change in pay grade; pay grades can have more than one rank. For example, in the Army and the Marines, both a Master Sergeant and a First Sergeant fall under the E-8 pay grade. Thus, one may have a higher rank but still receive the same pay.

Rank Insignia of the U.S. Armed Forces: Officers

Commissioned Officers vs. Warrant Officers

In the US military, Officer ranks consist of commissioned officers and warrant officers. These ranks hold presidential commissions and are confirmed by the Senate. Army, Air Force and Marine Corps.

Commissioned officers

Commissioned officers are divided into:

  • Company grade officers – those in pay grades of O-1 to O-3
  • Field grade officers – those in pay grades O-4 to O-6General officers – those in pay grades O-7 or higher
  • Equivalent ranks in the Navy

The equivalent officer groupings in the Navy are:

  • Junior grade
  • Mid-grade
  • Flag

Warrant officers

Warrant officers hold warrants from their service secretary. They specialists and experts in certain military technologies or capabilities. For these officers:

  • the lowest ranking warrant officers serve under a warrant. They receive commissions from the president upon promotion to chief warrant officer 2.
  • these commissioned warrant officers are direct representatives of the President of the United States.
  • they derive their authority from the same source as commissioned officers but remain specialists, in contrast to commissioned officers, who are generalists.

There are no warrant officers in the Air Force.

A version of this article appeared in the April 2002 issue of Family Tree Magazine.

Tuesday, January 11, 2022

How to Search the Social Security Death Index

 By Sunny Jane Morton

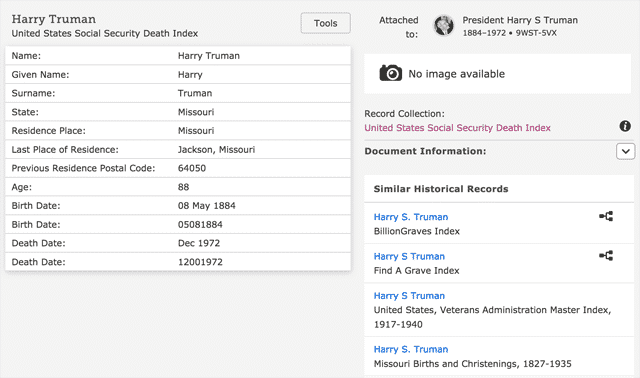
President Harry Truman’s SSDI listing, accessed via FamilySearch

In this article:

Who is in the Social Security Death Index?
What Details are Included?
Where Can I Search the SSDI?
Tips for Searching the Social Security Death Index
Related Reads

Looking for a totally free database of US death records? The Social Security Death Index (SSDI) is a valuable record set created from the Social Security Administration (SSA)’s Death Master File to track tax withholdings and Social Security survivors’ benefits. Here’s what the Social Security Death Index is, how genealogists can use it, and where to find it online.

Who is in the Social Security Death Index?

Though it doesn’t include every person who ever had a Social Security number, the SSDI generally includes all deaths reported to the SSA beginning in 1962 (though a few include deaths prior to that year). At time of writing, the SSDI cuts off at 2014.

What Details are Included?

The SSDI isn’t as detailed as some other Social Security documents, such as the SS-5. But you should still find the person’s full name, birth date, death date, state where the number was issued, and last known residence (down to the ZIP code level of detail). You may also find the person’s Social Security number.

Where Can I Search the SSDI?

The SSDI is widely available on genealogy websites—you don’t need to request transcripts from the SSA. Some websites include additional details in their SSDI databases that can help when you’re trying to distinguish between similarly named individuals.

You can search the SSDI for free at:

You can also search at Ancestry.com, but you’ll need a subscription. To search the SSDI across multiple websites, visit Stephen P. Morse’s webpage.

Tips for Searching the Social Security Death Index

It’s only fair to warn you that SSA indexes (including the SSDI) are not always complete or accurate. You might see any of the following:

  • Initials, nicknames or middle names instead of full names
  • Birth dates appearing only as a year, or not at allNames or dates that are entered incorrectly, such as 2 November (11/2) instead of 11 February (2/11)
  • Names that drop internal punctuation: OMalley or Omalley instead of O’Malley
  • Women’s paperwork filed under an unfamiliar married or maiden name (you may not have found every surname she used)
  • Unfamiliar places of issue, residence or last known benefit (people could apply from anywhere, and you may not know every place they lived)

If needed, run several searches with different combinations of names, dates and places. Explore all possible results, even partial matches. It may take a while to accumulate enough bits and pieces of evidence—from Social Security or other documentation—to identify a correct entry.

Last updated: October 2020

A version of this article appeared in the January/February 2021 issue of Family Tree Magazine.

Thursday, January 6, 2022

How to Convert Old Slides to Digital

 By Allison Dolan

Two images of old slides with arrow in the middle, indicating converting slides to digital

How can I digitize my old slides?

Q: I have some 35mm slides that I want to put on my computer. Also, the color on these pictures has turned red. What’s the best method to save these slides?

A: If you have a flatbed scanner, you may be able to find a special attachment for scanning slides, but these don’t always produce good results. Luckily, you can get a slide converter such as this KODAK Slide N Scan.

Alternatively, your local photo lab may be able to convert the slides for you, or you can use a service (great for large quantities) such as ScanDigital or ScanMyPhotos.

Color shifting in slides is common, says photo expert Maureen A. Taylor. “To slow the process, store color photographic materials such as prints and slides in a dark, cool place that is not subject to fluctuations in temperature and humidity. Large archives actually store their color materials in refrigerated vaults.”

Though it may not be possible to return the images to their brand-new appearance, most professional services can correct the color and remove scratch marks. Do-it-yourselfers can use photo-editing software such as Adobe PhotoShop Express.

Make sure you save the unedited scans as TIF files, a format that does the best job of preserving image quality. Make copies of the images to edit. Store the edited copies as high-resolution TIFs, too. For sharing or posting online, copy the edited files as JPGs (which reduces file size).

Finally, be sure to back up your digitized images. The best way is with an online storage service. You also can save the files to an external hard drive kept in a location away from your home. Give copies to family, too.

Answer provided by Allison Dolan

Can I scan multiple slides at once?

Q: I have a few thousand 35 mm color slides. I’d like to know if there’s any agency that’s able to convert these slides to digital format. I don’t mind scanning several at a time at home, but I don’t have time to scan thousands of slides. As an alternative, are you familiar with any slide scanner that does multiple slides at once?

A. Some slide scanners can handle multiple slides at once, but experts advise scanning slides individually to maintain image quality. You might want to consider scanning limited numbers of slides at first. Evaluate your collection and choose a select few.

After carefully examining your slide collection, you’re ready to start thinking about purchasing a scanner. With scanners’ wide price range—from less than $100 to $2,000—you need to study your options. Next, identify the key features you want in a scanner. Read user reviews of scanners at before shopping around.

If you opt not to buy a scanner, you can take advantage of scanning services offered by many camera stores. Services range in price from $2 to more than $10 per slide. Whether this is cost-effective for you depends on the number of slides you want scanned and the value of your time. Before sending all your slides to one store, try the services first to see if you like the results. Selecting a method to scan slides is a personal decision based on your reasons for scanning the collection balanced with the number of slides and costs.

A version of this article appeared in the June 2003 issue of Family Tree Magazine.

Answer provided by Maureen A. Taylor

Updated: November 2021

Tuesday, January 4, 2022

Daguerreotype, Ambrotype and Tintype: Telling Them Apart

 By Maureen A. Taylor

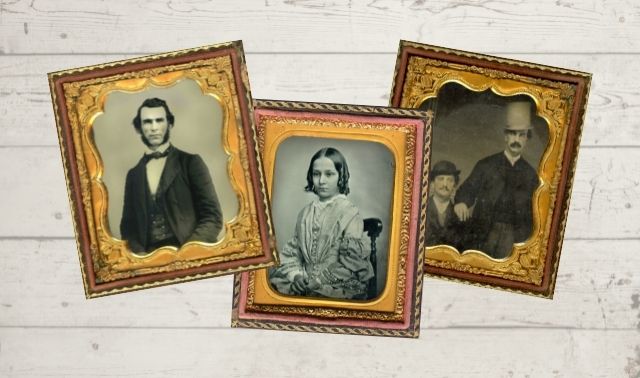
When an individual visited a photo studio in the late 1850s, he could choose the style of portrait—shiny reflective daguerreotype, glass ambrotype, metal tintype or a paper card photo. This is a key part of identifying a photo from the mid-19th century. If an image was taken before 1854, then it’s a daguerreotype, but if it was taken after that point, then it could be one of the others.

Daguerreotypes

Daguerreotypes, introduced in 1839, have a distinctive appearance. Because they’re reflective, you have to tilt them at a 45-degree angle in order to view the image. Otherwise, the silver-coated copper plate is often so shiny you just see yourself in the plate.

Ambrotypes

Ambrotypes, patented in 1854, are on glass. Backed with a dark substance (such as varnish or paper) they look positive, but when the backing starts to deteriorate, you can often see through the glass. This gives the image a ghostly appearance.

Tintypes

Tintypes, patented in 1856, are actually on iron, not tin. Unlike a daguerreotype, tintypes are not reflective. While you can find them in cases (like the previous two image types), most tintypes found in collections aren’t in any type of protective sleeve or case.

Paper cards

Card photographs (introduced in the United States about 1859) are on cardstock and instantly recognizable.

Case study: Daguerreotype, ambrotype or tintype?

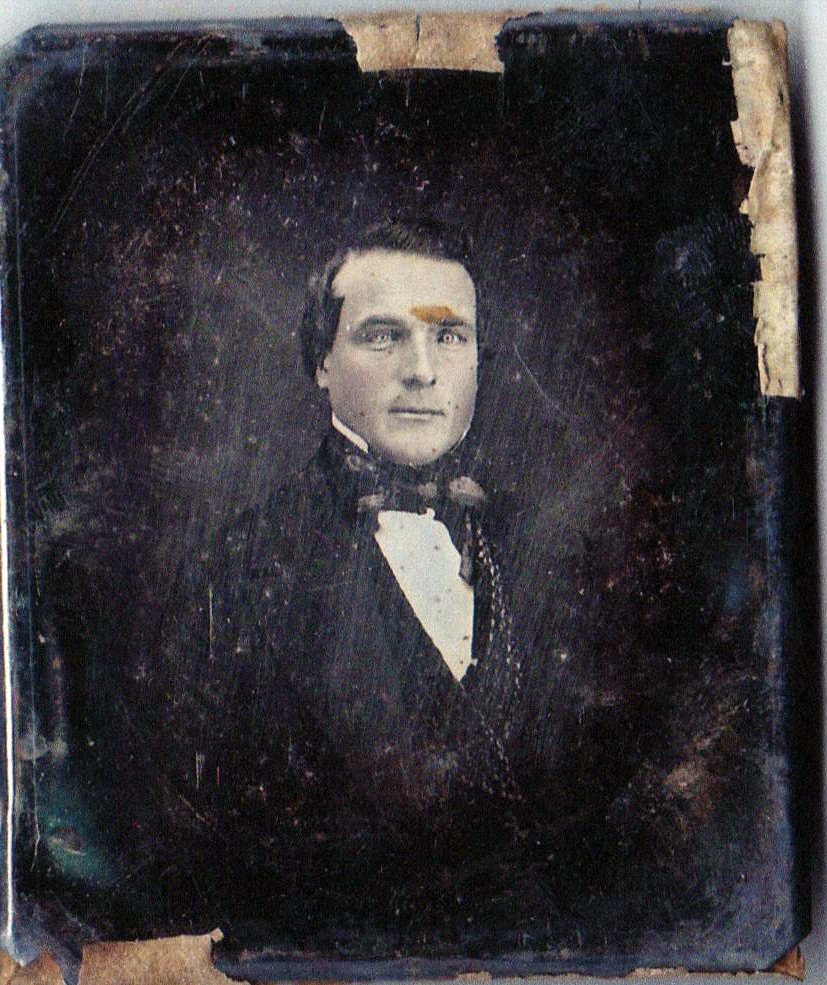
Portrait of James Pennington
Family Tree Magazine reader Jay Kruizenga’s ancestor James Pennington’s dreamy blue eyes and trendy 1850s fashion.

James Pennington posed for this photo about 1857, which means his portrait could be a daguerreotype, ambrotype or tintype.

Jay’s cousin sent him the pictures digitally. When she photographed the images, she propped them on a dark surface to decrease the reflection. Plus, the image has a type of deterioration known as a halo, usually found on daguerreotypes. I’m leaning toward it being a daguerreotype, but sometimes a digital image can be deceiving.After reading Jay’s family history website, it’s pretty clear when James posed for this image. He married his wife Esther Inwood in 1857. Both James and his bride are dressed for the occasion. (If you’d like to see a wonderful example of how to present your family history on the web, take a few minutes to look at Jay’s site on James Pennington. You’ll find everything from narrative to documents and DNA.)

Thursday, December 30, 2021

How to Preserve Newspaper Clippings

 By Denise May Levenick

A person cutting out newspaper clippings with scissors.

Does your family archive hold yellowed and crumbling news clippings from years gone by? If so, you have a lot more than an old newspaper in your hands. You own a piece of history that’s becoming more rare each day. But unfortunately, that same clipping is a toxic time bomb that can damage anything it touches, turning artifacts into archival junk in just a few short years.

It’s the very nature of newspapers to be short-lived: Yesterday’s headlines are constantly being replaced by today’s breaking news. Newsprint is so acidic that some museums routinely copy news clippings and destroy the originals. Early broadsheets and newspapers were printed on paper made from the cotton rag pulp, but by the 1880s most newspapers were printed on cheap paper made from untreated wood pulp. The high concentration of acid and lignin in this type of newsprint causes the paper fibers to break down when exposed to heat, light, air, and pollutants.

Describe the origins of your heirlooms for better integration with your family history using this free form.

What’s the family historian to do? Save every newspaper clipping for posterity? Or duplicate, and then destroy? Not to mention preserving your own family’s news stories that you continue to clip and save for your children or grandchildren. Is today’s news truly trash?

Don’t despair. Before you add your old newspapers to the recycling bin, get to the bottom of the story about how to create a properly preserved family news archive.

1. Digitize your clippings

Museums, archives and public libraries have adopted different tactics when it comes to preserving newspapers. While museums and archives aim to preserve original materials, libraries want to make the information in that material easily available. Some organizations might print copies of newspapers and clippings on archival paper and discard the original due to lack of space and funds for archival supplies.

Your own family history news archive may hold original full-size newspapers, loose clippings, photocopied articles (some pasted into scrapbooks), as well as a variety of scanned news clippings and photocopies, and typed transcriptions.

Your first preservation step is to digitize paper copies (whether original newsprint or photocopies on regular office paper) by taking a photo with your digital camera or scanning the paper. With a desktop scanner, check the option for de-screening to eliminate those tiny dots from the original printing process. If the publication information isn’t printed with the clipping, write or type it (newspaper title, date, volume and issue, page number, and the repository or website holding the paper) and include it with your scan. Add your own identifying index words, such as the surname the item is associated with, plus the place or the event depicted.

Got a full-size paper to digitize? I’ve found the simplest way is to take a digital photo of the entire page. My camera takes an 8.1 megapixel image that allows sufficient enlargement on the computer to easily read the articles. Covering the page with a piece of nonglare glass will help flatten creases, but can make the final scan harder to read, so try it both ways. Use a tripod or flexible mount to hold your camera steady.

You also could use a portable flatbed scanner to make multiple images you can “stitch” together with included software. A typical newspaper page might require several scans to capture the entire page. With the Flip-Pal, you can position the scanner to overlap the images, then use the stitching software to create a full-page image. The scanning and stitching process can be time-consuming if you have many full newspapers.

I don’t recommend using your desktop scanner for anything larger than the scanning glass because it’s difficult to maneuver a full newspaper page without damaging the paper.

2. Protect against acids

Museums sometimes preserve aging newsprint by deacidification, a process that neutralizes the acids in the paper, and alkinization, which adds buffering ingredients to the paper.

You can do this at home by treating small clippings with a deacidification spray such as Archival Mist (from EK Success), Make-It-Acid-Free (Krylon), Wei T’o (Wei T’o Associates) or Bookkeeper (Lineco), available where scrapbooking supplies are sold. Follow the instructions on the packaging. But note that these sprays are effective for only seven to 10 years before they need to be reapplied. To maximize longevity, place the treated clipping on a sheet of buffered paper and then tuck it inside a polyester sleeve (see step 4 for more on storing your clippings).

The cost of deacidification sprays—about $14 to $50 for a 6-ounce bottle—and the amount needed for an entire newspaper or collection of clippings makes it impractical for many family archivists. If you do use a spray, test it first on a small area to make sure the ink won’t run. You can find internet recipes for homemade deacidification solutions, though reliability varies. The Northeast Document Conservation Center (NEDCC) recommends against these. For home archives, the NEDCC says it’s more practical to digitize clippings and print copies on archival paper, then properly store the originals (see step 4).

3. Organize and file

Many family historians file obituaries, marriage notices and other clippings in their primary filing system, under an individual or family. This is a great way to keep research materials together about a family, but it isn’t the best way to store newsprint items. The acid in newsprint can easily migrate to adjacent documents and photos and damage them.

Your goal should be to make all your clippings a uniform size: on 8.5×11-inch archival paper filed alphabetically by surname, event or location so that you have only one place to look for an item. Decide if you’ll preserve original clippings or just copies. The easiest file to care for includes copies made only on bond paper. But I love the look and feel of old newspapers, so I tend to keep original clippings in my file. To reduce the risk of damage to other documents, I place each clipping on a sheet of buffered paper—no glue, tape or adhesive. The buffering agent in the paper helps neutralize acid in the newspaper and prolong the life of the paper. Slide the paper and clipping inside an archival page protector, leaving the top open. This allows the paper to “breathe” and acids to escape.

 I also keep printed transcriptions, abstracts and extracts of newspaper articles in my file. Print copies of your digitized clippings on acid-free, buffered archival paper. Consider making duplicates for your genealogy files.

4. Store safely

Evaluate the size of your collection and purchase suitable-sized archival boxes, folders and buffered acid-free tissue (see the box for suppliers). You’ll need newspaper-size boxes for full-size sheets and folder-size boxes for clippings.Open full newspapers flat and store them separated by buffered tissue and folders. I find it easier to keep track of clippings by storing the sleeves in three-ring binders. Archival suppliers offer acid-free, lignin-free notebooks with slipcases and tab dividers you can use. You might need to keep large clipping files in a filing cabinet.

Store your boxes and binders away from light, dust, pests, and extreme temperatures and humidity. If you keep your file in a cabinet, open it occasionally to air out any acids that have been “off-gassed.” Your newspaper archive should be stored separately from other material in your archive—don’t put photographs and documents in the same folders or boxes. Periodically review the file and remove any damaged items. Reprint them on new archival paper if necessary.

5. Create an index

Your clipping file will be more useful if you create a searchable index using keywords and other pertinent information associated with each article. Set up a spreadsheet with columns for Surname, Locality, Event, Date, Publication, Page/Column, Digital File Name and Clip File Reference Number (if you’re using a numerical filing system). Enter each clipping into the database and keep an updated copy of your index at the front of your clip file. If you also save the index to the “cloud” using Evernote or Google Drive, you’ll be able to access it from anywhere you’re researching.

By taking a few hours to create a family history clip file that includes news clippings relevant to your ancestors’ lives as well as to your own family, you’re preserving primary documents that your descendants can see and touch. In a world that’s becoming more paperless all the time, your very own family news archive will be a unique legacy for the future.

A version of this article appeared in the January/February 2013 issue of Family Tree Magazine.

Tuesday, December 28, 2021

How to Care for Vintage Christmas Ornaments

 By Denise May Levenick

Most vintage Christmas ornaments don’t survive with their original boxes intact. When you do have the ornaments along with the box they came in, the set becomes more interesting to collectors and family historians. The packaging can help to identify the ornament and add to its value, but the flimsy cardboard box deserves a little extra care for long-term survival. Most ornament boxes were made of inexpensive cardboard, often with a lightweight cellophane window to display the colorful contents.

Fortunately, Christmas decorations spend most of the year tucked out of sight from heirlooms’ worst enemy: light. When holiday decorations are stored in out-of-the-way places such as basements, attics and garages, however, fluctuating temperatures, moisture and pests all can cause damage, making Christmas not so merry after all.

If you own such holiday treasures, follow these guidelines to ensure they bring joy for many Christmases to come:

1. Display your ornaments safely

Place cotton batting or foam padding under your tree in case an ornament falls (you can cover it with a tree skirt). Check ornaments’ caps and hooks before hanging to make sure they’re strong . Wrap thin hooks around branches for support, or add new wire hooks. Keep them away from direct sunlight. Another idea is to store and display them inside a dust-free cabinet.

2. Clean carefully

After taking down the tree, gently dry-dust old glass baubles—detergents and even plain water can remove paint. Wipe paper or cardboard surfaces, with a slightly damp cloth, but to prevent warping, clean a small area at a time and let dry.

Avoid washing antique fabric ornaments such as velvet and crochet. Instead, take them to a professional conservator for treatment. It’s OK to polish metal ornaments if they’re colorfast (test a tiny area first). Clean wax ornaments with warm water and a soft cloth; if they’re bent out of shape, use a hair dryer on low to soften the wax and reshape it.

3. Pack using the correct materials and store in a safe location

Start your storage solution by individually wrapping each ornament in acid-free tissue paper, available from archival suppliers before placing it in its original box. Then set that box inside another box to prevent crushing and damage. If any ornaments lack their original boxes, use sturdy, acid-free divided boxes to hold your collection. Opt for heavy cardboard over plastic containers, which prevent moisture from escaping. Be sure to store your keepsake ornaments in a location that remains dry and cool year-round.

Acid-free tissue paper

Archival, acid-free tissue paper is one of the most useful supplies in an archivist’s toolkit. Although it looks like regular tissue paper, archival tissue is manufactured to remove damaging contaminants. Regular tissue paper becomes acidic, discolored and brittle over time—damage that extends to adjacent objects through acid migration.  

Tissue paper is available in sheets or on rolls. Cut pieces to size and crumple to cushion fragile items or stuff inside the sleeves of a gown to prevent creases, or wrap gently around glass ornaments to shield them from light and dust.
Purchase acid-free, unbuffered tissue from a local art store or an archival supplier such as Hollinger Metal Edge, Brodart or Gaylord.

Fiberfill

For additional protection between ornaments and the bottom of a storage box, use 100 percent polyester fiberfill (the same kind of material used in quilts). You can remove any dividers and trim the batting to cover the bottom and extend up the inside of the box, or cut to fit the bottom of divided sections. Polyester batting is available from fabric stores and archival suppliers; avoid batting made with recycled or unknown materials.

What to Do With Broken Ornaments

Fragile glass ornaments can crack or break without notice. But don’t throw out those chipped, nicked or damaged globes just yet: You can breathe life back into them and show off their charm with a little artful staging to hide the blemishes.

Put them on a pedestal: A broken or chipped neck can make it difficult to attach a hanger when you’re decorating your tree. But geometric patterns and all-over designs still look beautiful if you turn the ornament upside down and display it on top of a candlestick holder or in a glass vase or bowl. For a centerpiece or mantel decoration, assemble three or more ornaments on a table with a candle.

Fix them: Missing metal caps, fasteners and hangers are replaceable. You’ll find a wide variety of styles and sizes from supplier D. Blümchen & Co.

Group them together: Holes and scratches are usually the result of a fall off the tree or a bump into a hard surface. The ornament might look fine on all sides but one. Collect similarly damaged ornaments, along with any others you’d like to display differently, and carefully arrange them in a large glass vase, bowl or hurricane candle holder. Place the display where it’ll catch the room’s light and watch the ornaments’ colors come to life.

Pick up the pieces: If an ornament that’s special to you breaks beyond repair, you could carefully gather the salvageable pieces into a decorative glass box to bring out at Christmas.     

Identifying Shiny-Brite Ornaments

Count yourself lucky if your family managed to preserve a box or two of classic glass Shiny-Brite ornaments. The history of these decorations dates back to the hand-blown glass ornaments made in mid-19th-century Germany. By the 1920s, glass ornaments also were produced in Japan, Czechoslovakia and Poland. But when World War II closed the door to European imports, German immigrant Max Eckardt seized the opportunity to create an American version.

Eckardt worked with the Corning Glass Co. to manufacture clear glass balls, which were then shipped to his four Shiny-Brite factories in New Jersey to be hand-painted. The ornaments became a popular replacement for German-made baubles, and after the war, Eckardt’s Shiny-Brite became the world leader in production of glass Christmas ornaments.

You can use the caps and hangers on Shiny-Brite ornaments to help date them. Early ornaments were made with metal caps, but wartime shortages made it necessary to switch to a cardboard tab. Learn more about midcentury glass ornaments by visiting the The Golden Glow of Christmas Past website.  

A version of this article appeared in the December 2014 issue of Family Tree Magazine.

Thursday, December 23, 2021

FamilySearch.org: 22 Tips to Find Your Ancestors (for Free!)

By Family Tree Editors Premium

A free website from the Church of Jesus Christ of Latter-day Saints (the Mormon Church), FamilySearch has a large, growing collection of records, books, photos and family trees. Since going online in 1999, the site has expanded to encompass more than 3,000 historical record collections from around the world, more than 7 billion searchable names in old records, and more than 450,000 digitized books.

You can search many of these records by name and other details, thanks to FamilySearch’s volunteer indexing program. All the genealogical bounty is accessible from tabs at the top of FamilySearch.org.

Wait… Is FamilySearch really free?

When we say, “Everything on FamilySearch is free,” you’re probably waiting for caveats and limitations. Everything really is free! You will never be asked for credit card information or even to make a donation.

FamilySearch is funded by The Church of Jesus Christ of Latter-day Saints, which has a strong religious commitment to families. But you don’t have to be a Church member to use the site. And creating a free user account will not prompt the Church to send you religious materials (unless you create a Church member account.)

In fact, the only significant caveat is that you do need to create a free FamilySearch user account to maximize access. You can search the Catalog without logging in. But you’ll need that user account to search or browse actual records or contribute to the Family Tree (which anyone can search or edit).

For a small minority of collections, you actually have to go to the Family History Library or one of its satellite libraries near you to view records, like you would a reference copy of an encyclopedia at your local public library. But that’s the end of the fine print. The site really is free—and everyone should be using it.

Sunny Jane Morton

Use these tips and search strategies for success in finding your ancestors on FamilySearch.

1. Search for records.

At last count, FamilySearch is home to more than 4 billion historical record images from around the world. Just take a second to let that figure sink in: 4 BILLION IMAGES. Not just 4 billion estimated names in images, but 4 billion actual images, many with lots of names on each.

These aren’t just a bunch of so-so records. They are high-quality genealogical documents, painstakingly gathered over the course of several decades from repositories around the world. That’s worth breaking down into more detail:

  • High-quality genealogical records: FamilySearch prioritizes acquisition of the most genealogically-rich genealogical collections for each region. They look for the records that most reliably reveal the most names, dates, places and family relationships.
  • Painstakingly gathered: FamilySearch’s predecessor organization began microfilming the world’s historical records in 1938. That gave them a decades-long head start compared to other genealogy websites. Now they’ve got a library of 2.4 million rolls of microfilmed records, which they finished digitizing in 2021. And that doesn’t even include the 300 camera crews currently capturing digital record images.
  • Repositories around the world: As a nonprofit organization with truly global scope, FamilySearch has imaged records from more than 200 countries. They don’t have “target markets” that slant their priorities toward the needs of paying customers because there are no paying customers. In fact, FamilySearch actively seeks out records for locations that don’t already have good online coverage on other websites. That’s why you’ll find so many records uniquely on FamilySearch for places in Central and South America, Africa, Asia and elsewhere. (They’ve still got you covered for the United States, the United Kingdom and Europe.)

Record images are going online at FamilySearch so quickly that many are not searchable by name yet. But about 7.5 billion names are searchable. Follow these tips to search for your ancestors’ names on FamilySearch.org. Explore some FamilySearch record highlights we’ve talked about, such as WWI records and these highlights from around the globe.

Sunny Jane Morton

Records search strategy

Under the Search tab, click Records to bring up a search form for a person in indexed records. You can enter the first and last names and the date range and place for one or more life events, such as birth, marriage, death, residence (useful when looking for census records), death or “any,” which could be, for example, an immigration or military enlistment year. Narrow your search with names of the person’s parents, spouse or another person who might appear with him in records. You also can restrict your results to those from a certain country or of a certain type (such as census or military records).  

On the search results page, look to the left for fields where you can adjust your search terms. Below that, you can use filters to narrow your search by collection (which lets you limit results to one or more databases), a birthplace in the record, a birth year in the record, and more. 

A camera icon in the far right column for a match indicates a digital image you can download to your computer and/or add to your tree; no camera icon means it’s an index-only record. In a few collections, due to the wishes of record custodians, you must register with FamilySearch to access record images or use the website at a FamilySearch Center (also called a Family History Center; find one near by searching here online). Some collections, such as the 1901 census of England and Wales, link to a record image on a subscription site. You can view these with a subscription or by visiting a FamilySearch Center.

Rick Crume

2. Set up notifications for family tree profiles.

As critics of FamilySearch will be quick to tell you, any user can edit your family tree on the site. While a powerful tool for collaboration, this functionality opens the door for questionable details to be added to your hard-earned research.

To counter this, FamilySearch also allows you to receive notifications when someone adds or edits details to an individual’s profile. Simply click the star next to Follow when viewing a profile, and the site will notify you when someone makes changes or adds records. With that, you can get in touch with other users and (hopefully) keep unsourced information from your tree.

Andrew Koch

3. Consistently browse record collections.

Searching a specific record collection that covers a place and time your family lived can help you focus on the most relevant matches. On FamilySearch, this technique also lets you access images of records that aren’t yet part of the site’s searchable indexes. Under the Search tab, click Records, then Browse All Published Collections to see a list of all records, both indexed and unindexed, arranged by place. If “Browse Images” appears in the Records column, none of the collection is indexed by name. If that column gives a record count, the collection is at least partially indexed. On the left, you can filter the list by name (enter any word in the collection title), place, date, record type and image availability. Click a title to search or browse that collection.

Rick Crume

If you’re not satisfied with your results on FamilySearch, check back every so often and search again. FamilySearch is continually updating its existing collections (and adding new ones!), so your search results may change over time. Simply go to FamilySearch’s list of collections, then sort by date updated.

Andrew Koch

4. Investigate individual collections.

Because FamilySearch has so many records, you can easily miss important results if you only search on the site’s main form. Instead, find individual collections that interest you and search them one by one. From FamilySearch’s search page, you candrill down to collections from a particular place. Alternatively, search for a collection by title or (again) view a huge list of all FamilySearch’s collections.

Andrew Koch

5. Look for multiple kinds of records.

Censuses and vital records make up the bedrock of genealogy research, but they shouldn’t be the only resources you look for. FamilySearch’s database holds all kinds of genealogy records, from tax records to probates to passenger lists. From the main search form, you can filter by name of collection (which often includes record type). Also remember to browse for records collections by location, so you can see what FamilySearch has in your area.

Andrew Koch

6. Find relatives in the FamilySearch Family Tree.

Over the past few years, FamilySearch has been inviting the world to contribute to what’s become the biggest community-based family tree around. So far, over 5 million people have participated. Whether you contribute or not, you can still learn from this massive tree.

First, you’ll need to understand the community-based tree model. Like Geni.com and WikiTree, the FamilySearch tree is a single, public tree. The idea is to promote full collaboration instead of populating the site with millions of individual trees that duplicate effort (but maintain control and privacy). There are also dedicated spots to collaborate and contribute personal memories.

There are drawbacks to this approach, such as when less-knowledgeable researchers change well-supported data. But there are powerful upsides, too. Not least, it’s easy for anyone to search the FamilySearch Tree for specific ancestors to see what others have already discovered about them. Ideally, among the 1.3 billion personal profiles, you’ll find only one profile of any given ancestor, with all user-contributed data neatly organized within: life events, relationships, sources, record images, photos, memories. In reality, there’s some duplication, but far less than you’ll find at sites with individual trees. And all data about deceased individuals is public to anyone with a free FamilySearch guest account.

FamilySearch Product Manager Ron Tanner talks about why you might want to participate in the Family Tree:

Sunny Jane Morton

FamilySearch Family Tree search strategy

To search the tree, look under the Family Tree tab and click Find. You can enter a name; gender; dates of birth, christening, marriage, death and/or burial; and family members’ names. 

Adding your relatives to the tree can help you find their records, as FamilySearch automatically searches its records for matches to people in the tree. Click the Family Tree tab to start your tree and either manually enter the information, or use “FamilySearch-approved” genealogy software that can reconcile data between the family file on your computer and Family Tree. Those programs include Ancestral Quest, Legacy Family Tree, RootsMagic and MacFamilyTree. To avoid duplicating people already in the tree, FamilySearch looks for a profile for each person you’re adding.

Click on an icon beside a name in landscape or portrait tree view for research help. Record hints are blue, research suggestions are purple, and data problems are red. Record hints and research suggestions also appear under the Details tab in Person view. You can review and verify possible matches, and attach the records to personal profiles. 

Rick Crume

7. Use wildcard characters in searches.

By using wildcard characters, you can broaden your search to include spelling variations. This ability is critical when researching records that may have been poorly indexed or transcribed incorrectly. Specifically you can use a question mark (?) to represent one missing letter, and an asterisk (*) to represent zero or more characters. For example, a search for Henders?n will return Henderson, Hendersyn, Hendersan and Hendersen.

Andrew Koch

8. Keep track of your searches.

If FamilySearch hasn’t recently updated a collection you’re researching, you’ll want to avoid repeating your searches. To make the most of your time, keep a log of your searches—what collection(s) you searched, what terms and filters you used, and what results you found (if any). This will keep you from doing the same work over again, plus help you better plan your search strategy. We’ve got a free downloadable template.

Andrew Koch

9. Switch browsers.

If you have trouble viewing records on FamilySearch, then try looking at them in a different browser. Some browsers play nicer with FamilySearch than others. Simply copy and paste the URL into a different browser window (such as Google Chrome, Firefox or Internet Explorer). You may have to sign in to your account again, but doing so will hopefully allow you to view the records correctly.

Andrew Koch

10. Experiment with match exactly.

In your searches, you’ll have the option of selecting Match All Terms Exactly. A search with this option will return only results that match the text in all fields you filled in. This can be a useful option if you’re trying to narrow down your results, but this can also exclude relevant matches that contain spelling errors or simply omit specific details.

Andrew Koch

11. Visit a Family History Center.

Check with your local Family History Center to see what resources they hold, as some records can only be accessed at FamilySearch-affiliated physical locations. These repositories, scattered throughout the world, often hold valuable records in book, microfilm and microfiche formats. Staff members at the facilities will also be happy to help you look for records, and may know key information about local history and record sets.

Andrew Koch

12. Explore the FamilySearch Wiki.

Wikipedia for genealogy?! Yes! The FamilySearch Wiki hosts nearly 100,000 articles to get you started (or help you break through a brick wall) with your current research question. Like Wikipedia, the FamilySearch Wiki is crowd-sourced, so its expertise may be uneven and some pages may be outdated. It’s still a go-to resource when it’s time to learn something new, especially about a really specific topic.

For example, the FamilySearch Wiki has learning pages for countries around the world, from Afghanistan to Zimbabwe. Most regions have focused articles on specific states/provinces, counties and even cities. Find articles on specific record types, such as U.S. probate records or Swedish household examination rolls. Need help reading Swedish (or other languages) or understanding genealogy terminology or abbreviations? There’s probably a word list you can use.

The following screen shot shows you a typical layout of a FamilySearch Wiki page. See how it points you to related content you might want?

A related how-to FamilySearch resource is more interactive: the FamilySearch Communities. These are social hubs for people with common interests (think German research) to exchange ideas or ask questions. Some questions may be fielded by the experts at the venerable Family History Library in Salt Lake City.

Sunny Jane Morton

13. Find family photos.  

Under the Memories tab, see at a glance all the photos, stories, documents, audio and albums you or someone else has submitted and linked to your relatives. To search the Family Tree’s photos, stories and documents for any term (such as a name, place or other topic), look under the Memories tab and select Find.

Rick Crume

14. Broaden your location search.

Records weren’t necessarily kept in the same town in which they were created. Study history, then identify where the records you’re looking for are currently held, as this might affect where FamilySearch categorizes them. For example, Austrian archives might hold records from some parts of modern Romania, as Austria-Hungary controlled western Romania until World War I.

Check the FamilySearch Wiki to determine what locations might have the records you’re seeking. Then turn to the Search by Place section on the site’s Search page to identify the relevant collections from that region.

Andrew Koch

15. Search user-submitted genealogies. 

Individual family trees are still valuable, and many are accessible on another part of the site. The Genealogies portal allows users to upload preservation copies of their personal family trees, which remain intact. (Scroll to the bottom of the page, then look at the right column to upload your tree file. You can delete or replace it anytime.) Users can also search among millions of names in these trees for their ancestors’ names, to see what others have learned about them. When you open a search result, you’ll see the name shown within the context of that tree.

Hear more about the Genealogies portal from FamilySearch’s Ron Tanner:

Sunny Jane Morton

Genealogies search strategy

Under Search > Genealogies, you can search the old Ancestral File and Pedigree Resource File, two collections of family trees that researchers submitted over many years. Pedigree Resource File includes notes and sources, but Ancestral File doesn’t. Neither collection shows the submitters’ names. It’s worth mining these family trees for clues, but always try to verify the information with original sources.

A Genealogies search now covers several other collections, too: Community Trees were an effort to cover the genealogy of entire towns or communities. Oral Genealogies were obtained with personal interviews. The International Genealogical Index (IGI) has information on 430 million ancestors contributed by members of The Church of Jesus Christ of Latter-day Saints.

Rick Crume

16. Browse through the FamilySearch Catalog.

Speaking of the Family History Library, that research mecca is the bricks-and-mortar partner of the FamilySearch website. As a FamilySearch.org user, you’ll want to know this, even if you don’t plan to visit the Family History Library anytime soon.

That’s because the Catalog of the entire Family History Library is searchable on FamilySearch.org. Maybe you’d like to find an old atlas, the membership records of a specific church or online deed indexes for your ancestor’s county. Search the Catalog by place to explore what resources are available for your locale of interest. If an item has been digitized at FamilySearch, the Catalog likely points to it (though updates are still ongoing). Even if the resource isn’t available online, you can click from that item’s entry to see what other libraries may have a copy.

Sunny Jane Morton

17. Find microfilmed records. 

It took years to digitize and index the massive holdings of microfilmed records at FamilySearch’s Family History Library in Salt Lake City. If you can’t visit the library, you can access the microfilm that has been indexed online from the comfort of you own home.

Under Search>Catalog, run a Places search to find books and microfilmed records about a place. Search on all the towns, cities, counties, states and countries where your ancestors lived. Run a Surnames search to find family histories. Note that this search covers only surnames mentioned most often in a book, not every name. You can search on multiple terms, such as a surname and a place, but you’ll probably have better luck by entering these terms in the Keywords box. 

18. Search digitized books in the FamilySearch Digital Library.

A lesser-known portal at FamilySearch is its Digital Library. In addition to the shelves of the Family History Library, the Digital Library offers titles made available by the Allen County Public Library Genealogy Center, Midwest Genealogy Center, The Ontario Genealogical Society and other major public and university libraries. Last time we checked, the book count was nearing half a million titles.

The Digital Library is a good place to keyword-search ancestral names, locations and the names of schools, churches, businesses and other organizations connected with which your family. You may find local histories, family histories, articles from periodicals and more.

Digital Library search strategy

Try searching on a name using the “Any is (exact)” option. To view a match, you must download the entire book (a PDF file), then use your PDF reader to search for the term in the book. Some digitized books can be viewed only in the Family History Library or a FamilySearch Center.

Here’s a tip: You can search the collections of an individual contributing repository. So if your family lived in Alabama or Texas, for example, you might try running a focused search in materials from the Birmingham Public Library or the Dallas or Houston Public Libraries.

Rick Crume

19. Look for indexes in imaged volumes.

Browsing an unindexed collection? Digitized volumes may contain handwritten or typed name indexes. Look for a volume with “index” in the title, and check the beginning and end of individual volumes.

Rick Crume

20. Search from a Family Tree profile.

FamilySearch can help you find records faster by filling in the search form with details on someone in the Family Tree. In the person’s Details view, look under the Search Records section of the right column and select FamilySearch, Ancestry.com, Findmypast or MyHeritage. You can attach a matching record from FamilySearch to everyone it pertains to in the tree. Look for the link at the bottom of the record to “Attach source to FamilySearch.”

Rick Crume

21. Get more help.

To find articles and videos about using FamilySearch, Click on the question mark icon in the upper right, then search the Help Center by topic. For example, search for Civil War, and the matches include an article on South Carolina Civil War service records of Confederate soldiers, videos on researching Civil War records and more.

Rick Crume

22. Volunteer to index records.

If you have a few minutes, you can index digitized records on your home computer and make them searchable. Click on Indexing > Overview to get started with FamilySearch Indexing. You never know what you might turn up just by volunteering your time!

Rick Crume

Some information in this article appeared in the March/April 2017 (Crume) and September 2019 (Koch) issues of Family Tree Magazine. Last updated, November 2021.
Thursday, September 9, 2021

Packing List for Genealogy Research Trips

By Diane Haddad Black and white photo of a woman carrying a suitcase. Genealogy travel requires a specific packing list, but you should be careful not to bring too much! Here are things I’ve found useful to bring (or not bring) when attending conferences and going to libraries over the years: Research Materials It doesn’t always work, but I try to carry around only the “stuff” I really need at the library, so I’ll have less to keep an eye on and can minimize fumbling around. Usually I have: my phone to access my tree, attached records and research log (I download any important documents to my phone in case I can’t get a signal at my destination). a little purse with my phone, a flash drive for digital copies, bills and change for copiers or copy cards a pen or pencil and a notebook with my prioritized list of materials I need to find, with pertinent notes about the people I’m looking for depending where I’m going, maybe a tablet in a computer bag, but I do tend to be more of a paper-and-pen note taker The Essentials Extra layer. No telling whether a conference classroom or library will be sweltering or over-air-conditioned, so bring a sweater. Extra bag. “I wish I had another bag” is a common comment by genealogists who pick up freebies and make purchases from Family Tree Magazine at conferences. Carry an extra tote bag around with you for purchases, handouts, syllabi, etc. Small comforts. Other things you might wish you had include hand sanitizer, tissues, a bottle of water (concessions can be pricey), address labels (for entering prizes at a conference), Dramamine (to help with microfilm reader motion sickness), your headache remedy of choice, gum (for a conference; it’s usually a no-no in libraries), and more-comfortable shoes. Drink and a snack. I rarely want to stop my research to go get lunch, and sometimes there’s no place to get lunch even if I want a break. You can leave water and a granola bar in the car for consumption outside, if there’s no snack room. Knowledge from the locals. If you’re going to a repository, cemetery or conference that’s new to you, ask local genealogists what you should know before you go. You might get inside info on the best place to park and eat lunch, staying safe, or a librarian who’s especially knowledgeable in your research area. If you don’t know anyone to ask, a genealogy pal might be able to put you in contact with a helpful person, or you could friend the local genealogical society on Facebook. Things to Remember Early-bird mindset. If you want to sit somewhere in particular for a class, arrive early to secure your spot. For some speakers, such as Elizabeth Shown Mills or Tom Jones, it’s a good idea to arrive early if you want to sit at all. Only what’s allowed. Visit a repository website ahead of time for info on what you can bring inside, whether you can use a cell phone or digital camera to photograph records, and how you’ll make copies (such as on a photocopier or scanner). Also double-check hours, any special closures, and whether materials are pulled from storage at particular times. Back-up plans. Plan where you’ll park, and where you’ll park if you can’t find a spot there.